 | |
| STEP 1 |
Adding an extension |
|
Log into the 3CX administrative interface and click on the Extensions header, from the left side of the page.
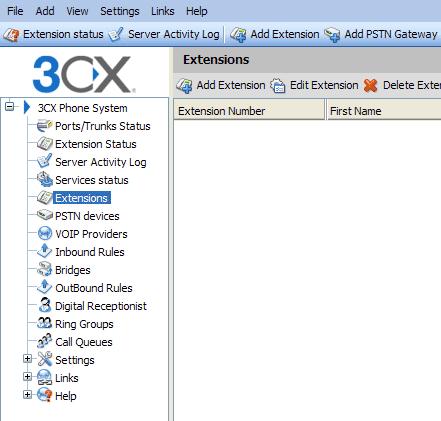
Click on the Add Extension link at the top of the loaded page. From the Add Extensions page, enter your Extension Number, name, and a password.
Once you have entered your credentials for this extension, please click on the Ok button to continue.

|
| STEP 2 |
Adding a VoIP Provider using the Callcentric template |
|
Next click on the VOIP Providers link from the left side of the page. Click on the Add Provider link from the top of the loaded page.
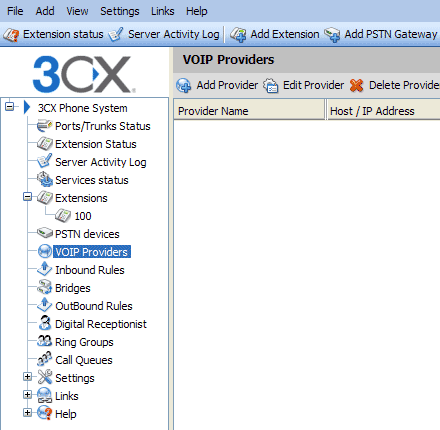
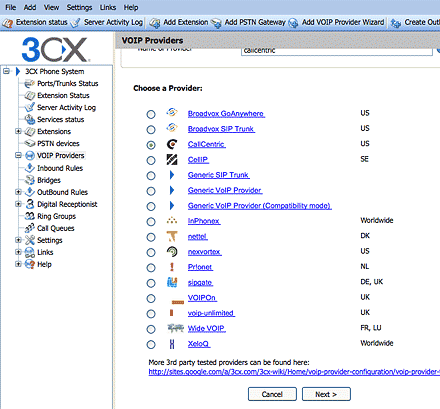
Once the Add VOIP Provider Wizard page loads enter callcentric in the Name Of Provider field.
You may now choose to configure a Generic VoIP Provider or use the Callcentric template.
If you wish to use the Callcentric template then continue with this step, otherwise go to step 2a.
Once you have made your choice please click on the Next button to continue.
You will now be provided with the ability to configure the servers which you connect to. You may click Next as these settings have already been filled in as shown below.

Once you have looked over this information you may continue on to Setp 3 by clicking Next.
|
| STEP 2a |
Adding a VoIP Provider manually |
|
We will now configure a Generic VoIP Provider. Please select this option and then click Next.
On the next page, please enter the following as indicated on the images below:
| SIP server hostname or IP | sip.callcentric.net |
| SIP server port | 5060 |
| Outbound proxy hostname or IP | sip.callcentric.net |
| Outbound proxy port (default is 5060): | 5060 |
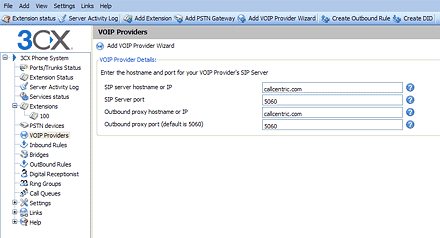
Once done click Next to configure the account details.
|
| STEP 3 |
Configuring account details |
|
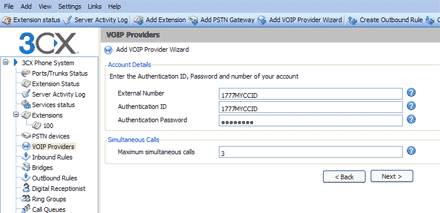
On the loaded page, click next again. You will now be required to enter your account information. As indicated in the picture below, please enter the following:
| External Number |
This is either the default extension 1777MYCCID OR 1777MYCCIDEXT, where 1777MYCCID is the 1777 number assigned to you by Callcentric and EXT is the three digit extension you are trying to register this UA to.
For example: 17770001234101 would register to extension 101 on account 17770001234.
You cannot register to your account using only the extension number.
|
| Authentication ID |
This is either the default extension 1777MYCCID OR 1777MYCCIDEXT, where 1777MYCCID is the 1777 number assigned to you by Callcentric and EXT is the three digit extension you are trying to register this UA to.
For example: 17770001234101 would register to extension 101 on account 17770001234.
You cannot register to your account using only the extension number.
|
| Authentication Password |
Enter your extension SIP Password here. Your extension SIP password is the password you created for the extension you are trying to use. You may edit the SIP password you wish to use in by logging into your My Callcentric account and clicking on the Extension menu link and then modifying the appropriate extension.
|
You may then set the Maximum simultaneous calls value to 3. Only users who are sure of what they are doing should change this value.
Once done click Next.
|
| STEP 4 |
Adding an Inbound rule |
|
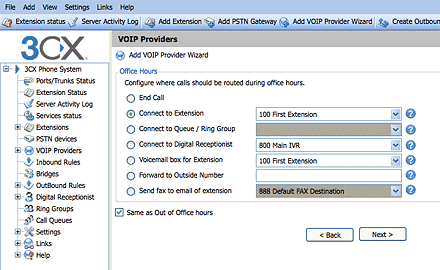
You will now be required to configure the inbound routing for incoming calls. You may send incoming calls to any pre-configured location such an extension or an IVR, among other choices.
Here we select the extension created earlier as an example.
Once done click Next to continue configuring your 3CX system.
|
| STEP 5 |
Adding an Outbound Rule |
|
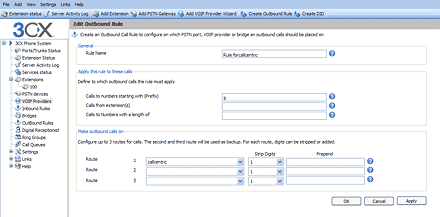
Next, you will be prompted to configure an Outbound Rule for the VoIP provider.
By default, the name of the rule should be set to Rule for callcentric.
Please ensure that the Calls to Numbers starting with field is blank.
You may of course change this later to any number you wish. By doing so an extension would need to dial the set number on an outbound call,
for example a popular qualifier is often the number 9.
To save your Outbound Rule and complete setup, please click on the Ok button.
| Rule Name | Rule for callcentric |
| Calls to Numbers starting with (Prefix) | |
|
| STEP 6 |
Line Status |
|
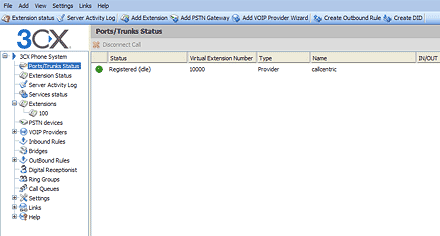
Once you have successfully configured your 3CX phone system, you can click on the Port/Trunk Status link on the left side of the page to see
if the PBX is registered normally. If there are problems with Registration please double check the logs to see the exact reason why 3CX is not registering normally to the Callcentric servers.
|
| STEP 7 |
Configuring advanced settings |
|
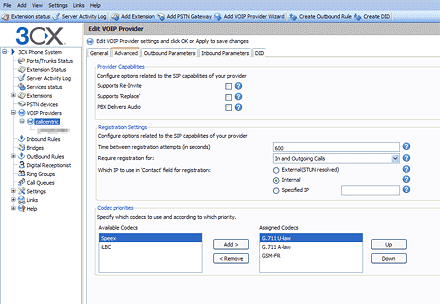
You can now configure advanced settings for the Callcentric trunk just configured. Ere we will configure the registration and codec settings.
Please click on the VoIP Providers link from the left side of the page and then select the
Callcentric configuration and click Edit Provider followed by selected the Advanced tab.
We will first configure the Registration Settings. Please make sure the following is set:
| Time between registration attempts (in seconds) | 3600 |
| Require (optionally: authorized) registration for | Both in-out calls |
| Which IP to use in 'Contact' field for registration | Internal |
We will then configure the assigned codecs. Under the Codec Priorities section please make sure that the following codecs are active:
G.711U-law
G.711A-law
GSM-FR
Once done click Ok to save your changes. You may double check the Port/Trunk Status to make sure that your registration
continues to operate normally.
Thank it! Your 3CX7 system should now be properly configured to work with the Callcentric services.
|
| STEP 8 |
Configure and test UA (User Agent) |
|
- Choose your desired UA
- Use the IP address or hostname for your 3CX phone system along with "100" (the extension created earlier which is the username) and the password for the 100 extension to connect to your 3CX phone system.
Next you will want to try placing test calls to and from your 3CX phone system using the UA currently connected to your newly created extension (100).
Once you have associated your UA to your 3CX phone system, you can make a test call to 17771234567, or if you are signed up for one of
Callcentric's rate plans you can place a call to a traditional landline or mobile phone by dialing either:
1 + the area code and number for calls to the US
Or
011 + the country code, area code, and number for calls worldwide (you may also use 00 instead of 011).
To test inbound calls from Callcentric to your 3CX installation, follow the directions
listed in this FAQ.
|
