| GENERAL INFORMATION |
 |
 The Zoom ATA 5801 is an inexpensive telephone adapter which works normally, if properly configured, with the Callcentric service when placed behind your broadband internet router. The Zoom ATA 5801 is an inexpensive telephone adapter which works normally, if properly configured, with the Callcentric service when placed behind your broadband internet router.
The information below is based on the Zoom ATA 5801 firmware version 1.2.4; although most other older and newer versions will look very similar.
|
|
| Configuring the Zoom ATA 5801 |
|
These instructions are based on using the Zoom ATA 5801 in its factory default configuration, which is to obtain a dynamic IP address automatically from your router using DHCP. This is generally how most users have their home routers configured. For information on configuring your Zoom ATA 5801 with a static IP address, please refer to the Zoom ATA 5801 user manual.
We recommend that you read each step through in its entirety before performing the action indicated in the step.
|
 | |
| STEP 1 |
Connect your router with the supplied Ethernet network cable to the Ethernet port of your Zoom ATA. Finally plug the supplied power cable into the Zoom ATA.
|
| STEP 2 |
Wait 60 seconds after plugging in the Zoom ATA's power adapter.
|
| STEP 3 |
Download and run the ATA Manager on your computer (http://www.zoom.com/atamanager/). This program will let you know the IP Address of your Zoom ATA and will automatically log you into the device's web configuration page using your default web browser.
|
| STEP 4 |
On the device's web configuration page, click on the Advanced icon.
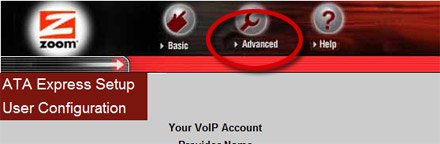
On the side menu bar, click on the link VoIP Accounts and click on the Your VoIP Account. As shown on the picture below, please use the following settings:
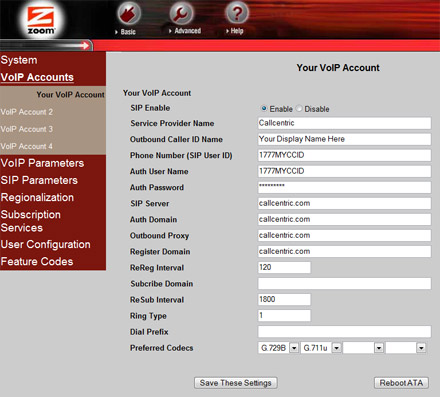
| Field | Setting |
| SIP Enable: | Enable |
| Service Provider Name: | Callcentric |
| Outbound Caller ID Name: | Enter your name in this field |
| Phone Number (SIP User ID): | This is either the default extension 1777MYCCID OR 1777MYCCIDEXT, where 1777MYCCID is the 1777 number assigned to you by Callcentric and EXT is the three digit extension you are trying to register this UA to.
For example: 17770001234101 would register to extension 101 on account 17770001234.
You cannot register to your account using only the extension number. |
| Auth User Name: | This is either the default extension 1777MYCCID OR 1777MYCCIDEXT, where 1777MYCCID is the 1777 number assigned to you by Callcentric and EXT is the three digit extension you are trying to register this UA to.
For example: 17770001234101 would register to extension 101 on account 17770001234.
You cannot register to your account using only the extension number. |
| Auth Password: | Enter your extension SIP Password here. Your extension SIP password is the password you created for the extension you are trying to use. You may edit the SIP password you wish to use in by logging into your My Callcentric account and clicking on the Extension menu link and then modifying the appropriate extension. |
| SIP Server: | sip.callcentric.net |
| Auth Domain: | sip.callcentric.net |
| Outbound Proxy: | sip.callcentric.net |
| Register Domain: | sip.callcentric.net |
| ReReg Interval: | 120 |
| Subscribe Domain: | Leave this field blank |
| ReSub Interval: | 1800 |
| Ring Type: | 1 |
| Dial Prefix: | Leave this field blank |
| Preferred Codecs: | 1 - G.729B
2 - G.711u
3- Leave this field blank
4 - Leave this field blank |
Click on the Save These Settings button to finish.
|
| STEP 5 |
Once you are done, on the side menu bar, click on the VoIP Parameters link followed by the Audio Settings link. As shown on the picture below, please use the following:
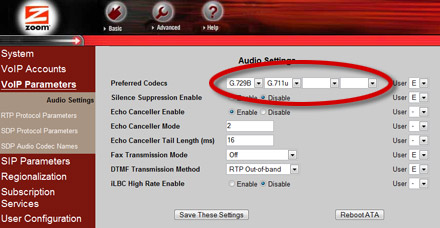
Preferred Codecs:
1 - G.729B
2 - G.711u
3 - Leave this field blank
4 - Leave this field blank
Click on the Save These Settings button to finish.
|
| STEP 6 |
Once you have completed the above, from the side menu bar, click on Subscription Services link, followed by the Subscription Service Settings link.
On this page, locate the setting Remote Feature Code and click on the radio button next to Enable, as shown below:
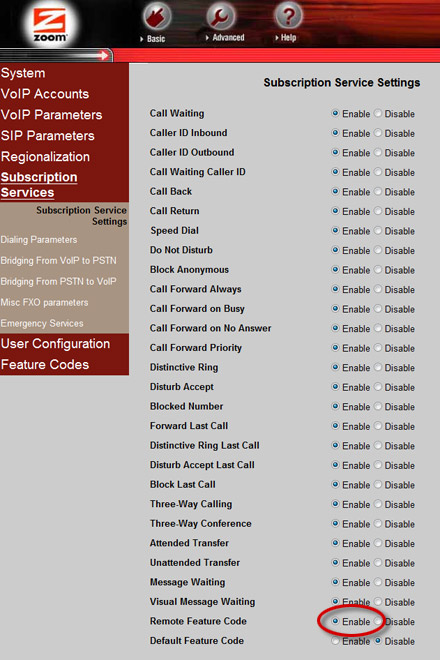
Click on the Save These Settings button to finish.
|
| STEP 7 |
From within the Subscription Services section, click on the link Dialing Parameters.
As shown on the picture below, please use the following settings:

Mode:
Passthrough (pass * and #DTMF tones to provider)
VoIP Dial Pattern:
[3469]11|*xxx.|**[1-9]e#r5xp3r*x|p8[1-9]e#r5xp4r*x|#[1-9]e#r5xp3r*x|1010Se#p2r*x|0Se#r5xp2r*x|123456789*0#
Hot Line Dialing:
Disable
Click on the Save These Settings button once you are done, and click on Reboot ATA, to restart the device.
|
STEP 8
|
That's it! You can now make a phone call.
You can make a test call to 17771234567, or if you are signed up for one of Callcentric's rate plans you
can place a call to a traditional landline or mobile phone by dialing either:
1 + the area code and number for calls to the US
Or
011 + the country code, area code, and number for calls worldwide
(you may also use 00 instead of 011). |
|
|
