| GENERAL INFORMATION |
 |
The MyPBX U100 is an IP PBX appliance developed by Yeastar. This IP PBX appliance, while compact, is feature rich and provides a perfect solution for a small to medium sized businesses.
Please note, Callcentric is not responsible for preventing unwanted physical or remote access to your IP PBX. If your IP PBX is compromised, you will be responsible for all associated damages.
Please be sure to read this guide regarding securing your IP PBX solution.
|
|
| RESOURCES |
|
Websites:
Yeastar Home Page
Help / Support:
Product Information/ Documentation/ Firmware
|
|
| Configuring the MyPBX U100 |
|
Here we will configure the MyPBX U100 through the web interface to properly route both incoming and outgoing calls to and from Callcentric. The information presented in this guide is based on firmware revision 15.18.0.24 of the MyPBX U100. If you are running a different firmware revision (or a different model of the MyPBXUx00 series of products), some of menu options and settings may be different. This guide assumes that you have administrative access to the MyPBX U100 administration web interface.
We recommend that you read each step through in its entirety before performing the action indicated in the step.
|
 | |
| STEP 1 |
Adding an extension |
|
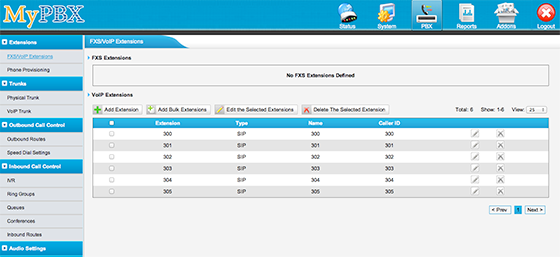
Log into the U100 administrative interface and click on PBX on the top menu bar. From there, locate the heading FXS/VoIP Extensions from the side menu and click on the Extensions option.

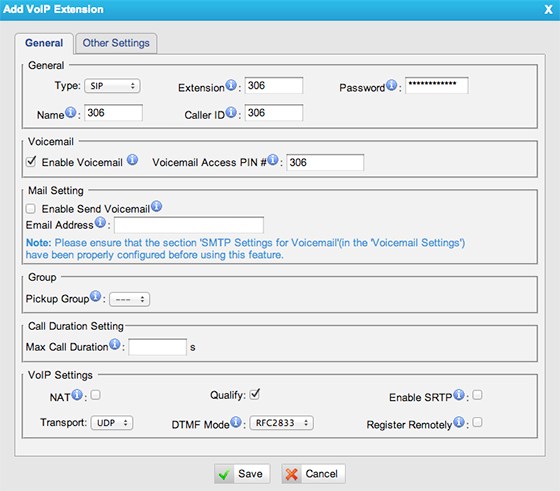
By default, the PBX should include a handful of pre-defined extensions that you can edit; or if you would like to you can create a new extension. To create a new extension, click the Add Extension button at the top of the loaded page. From the Add Extensions page, enter your Extension Number, name, and a password for the extension of your PBX. Once you have entered your credentials for this extension, please click on the Save button to continue.
Click on the yellow button labeled Apply Config at the top of the screen to apply the changes you just made.
|
| STEP 2 |
Adding a VoIP Trunk |
|
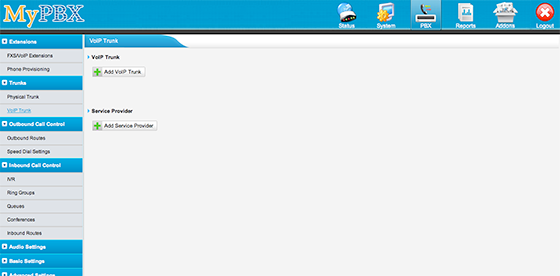
Next we will be defining a new SIP trunk on your PBX. To do so, locate the link VoIP Trunk from the side menu bar on the left. Click the Add VoIP Trunk button from the loaded page. A pop-up window should appear.
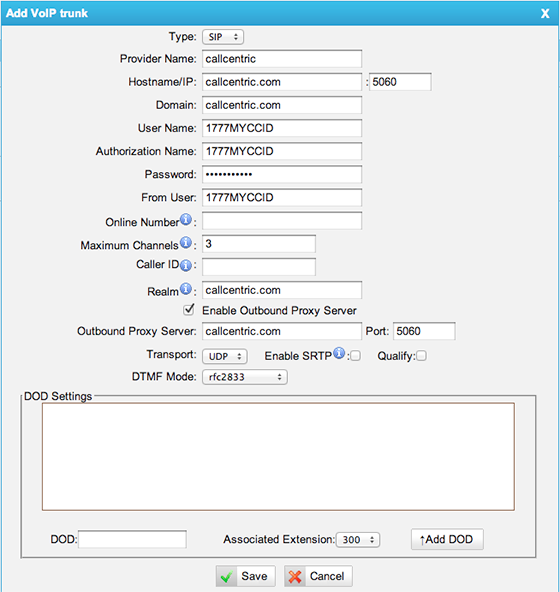
Once the Add VoIP Trunk pop-up window loads; as indicated on the screenshot below, please specify the following information:
| |
| Setting | Value |
| Provider Name | callcentric |
| Hostname/ IP | callcentric : 5060 |
| Domain | sip.callcentric.net |
| User Name | This is either the default extension 1777MYCCID OR 1777MYCCIDEXT, where 1777MYCCID is the 1777 number assigned to you by Callcentric and EXT is the three digit extension you are trying to register this UA to.
For example: 17770001234101 would register to extension 101 on account 17770001234.
You cannot register to your account using only the extension number. |
| Authorization Name | This is either the default extension 1777MYCCID OR 1777MYCCIDEXT, where 1777MYCCID is the 1777 number assigned to you by Callcentric and EXT is the three digit extension you are trying to register this UA to.
For example: 17770001234101 would register to extension 101 on account 17770001234.
You cannot register to your account using only the extension number. |
| Password | Enter your extension SIP Password here. Your extension SIP password is the password you created for the extension you are trying to use. You may edit the SIP password you wish to use in by logging into your My Callcentric account and clicking on the Extension menu link and then modifying the appropriate extension. |
| From User | This is either the default extension 1777MYCCID OR 1777MYCCIDEXT, where 1777MYCCID is the 1777 number assigned to you by Callcentric and EXT is the three digit extension you are trying to register this UA to.
For example: 17770001234101 would register to extension 101 on account 17770001234.
You cannot register to your account using only the extension number. |
| Maximum Channels | 3 |
| Realm | sip.callcentric.net |
| Enable Outbound Proxy Server | |
| Outbound Proxy Server | sip.callcentric.net : 5060 |
| Qualify | |
| DTMF Mode | rfc2833 |
|
| STEP 3 |
Configuring an outbound route |
|
To create a new outbound route for your PBX, locate the link Outbound Routes from the side menu bar on the left. Click the Add Outbound Rule button from the loaded page. A pop-up window should appear.
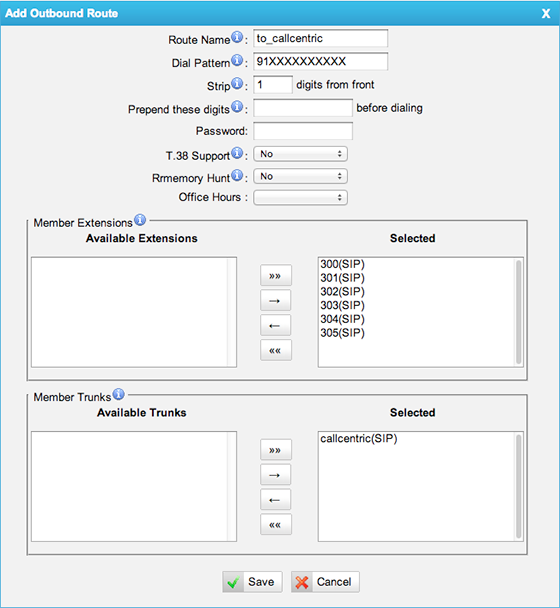
Once the Create New Outbound Rule pop-up window loads, please specify the following information, as indicated on the screenshot below:
| |
| Setting | Value |
| Route Name: | to_callcentric |
| Dial Pattern | 91XXXXXXXXXX |
| Strip | 1 |
| Member Extensions | In our example, we want all extensions of this PBX, the ability to place outgoing calls through our SIP trunk; in which we've moved all extensions to the Selected column. |
| Member Trunks | Move the callcentric trunk in the Selected column. |
Click on the Save button to continue.
Click on the yellow button labeled Apply Config at the top of the screen to apply the changes you just made.
|
| STEP 4 |
Adding an inbound rule |
|
You will now be required to configure the inbound routing for incoming calls. You may send incoming calls to any pre-configured location such an extension or an IVR, among other choices. Here we select the extension created earlier as an example.
From the left menu selection, click on Inbound Routes. Click the Add Inbound Rule button from the loaded page. A pop-up window should appear.
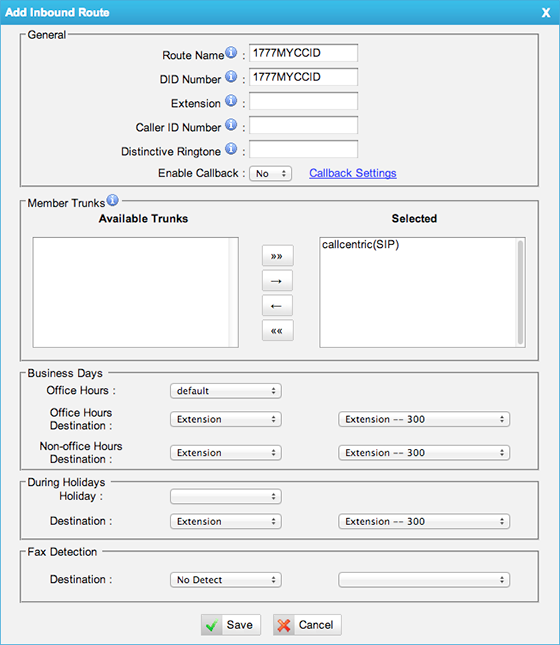
Once the Add Inbound Rule pop-up window loads, please specify the following information, as indicated on the screenshot below:
| |
| Setting | Value |
| Route Name | 1777MYCCID
* If you have acquired a phone number from us, please replace 1777MYCCID with your phone number (i.e. _12125551000). |
| DID number | 1777MYCCID
* If you have acquired a phone number from us, please replace 1777MYCCID with your phone number (i.e. _12125551000). |
| Member Trunks | Move the callcentric trunk in the Selected column. |
| Business Days / During Holidays | In our example, we want to route incoming calls towards extension 300 of our PBX regardless of the time. |
Click on the Save button to continue.
Click on the yellow button labeled Apply Config at the top of the screen to apply the changes you just made.
|
| STEP 5 |
Additional SIP settings |
|
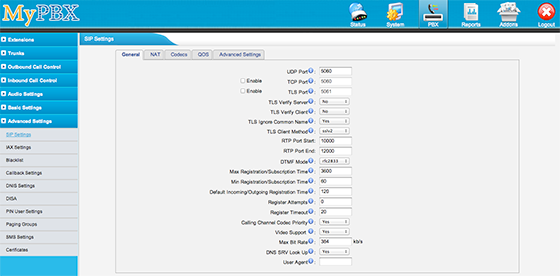
From the side menu options, locate the heading SIP Settings and click on the General tab.
On the SIP General configuration page, please locate the option DNS SRV Look Up and set this option to Yes; as indicated by the screenshot below:
Click on the Save button to continue.
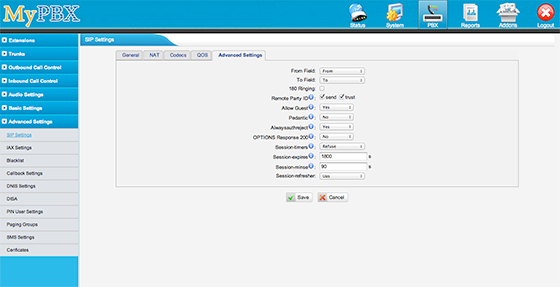
Next, click on the Advanced Settings tab and apply the following changes, as indicated by the screen capture below:
| |
| Setting | Value |
| From Field | From |
| To Field | To |
| Remote Party ID | both Send and Trust |
| Allow Guest | Yes |
| Session-timers | Refuse |
Click on the Save button to continue.
Click on the yellow button labeled Apply Config at the top of the screen to apply the changes you just made.
|
| STEP 6 |
Configure and test UA (User Agent) |
|
Choose your desired UA
Use the IP address or hostname for your MyPBX u100 along with "300" (the extension created earlier which is the username) and the password for the 300 extension to connect to your MyPBX u100.
You can make a test call to 17771234567, or if you are signed up for one of Callcentric's rate plans you
can place a call to a traditional landline or mobile phone by dialing either:
1 + the area code and number for calls to the US
Or
011 + the country code, area code, and number for calls worldwide
(you may also use 00 instead of 011).
To test inbound calls from Callcentric to your Yealink installation, follow the directions listed in this FAQ.
|
|
|
