| GENERAL INFORMATION |
 |
 The Yealink W52P is a DECT Cordless Phone System that was designed with the residential and small business user in mind. The Yealink W52P is a scalable solution that supports up to five handsets, has a crisp full color display, PoE support, and excellent battery life. The Yealink W52P is a DECT Cordless Phone System that was designed with the residential and small business user in mind. The Yealink W52P is a scalable solution that supports up to five handsets, has a crisp full color display, PoE support, and excellent battery life.
|
|
| RESOURCES |
|
Websites:
Yealink homepage
Yealink W52P product page
Help / Support:
Yealink W52P resource page
Yealink W52P product manual
|
|
| Configuring the Yealink W52P |
|
These instructions are based on using the W52P software version "425.30.0.20" in its factory default configuration which is to obtain a dynamic IP address automatically from your router using DHCP, which is how most people have their home routers configured. This guide also assumes that you've already associated your W52P's handset to the phone's base station. For information on configuring your W52P with a static IP address, as well as information regarding handset registration, please refer to the W52P user manual.
We recommend that you read each step through in its entirety before performing the action indicated in the step.
|
 | |
| STEP 1 |
Initial setup for your W52P |
|
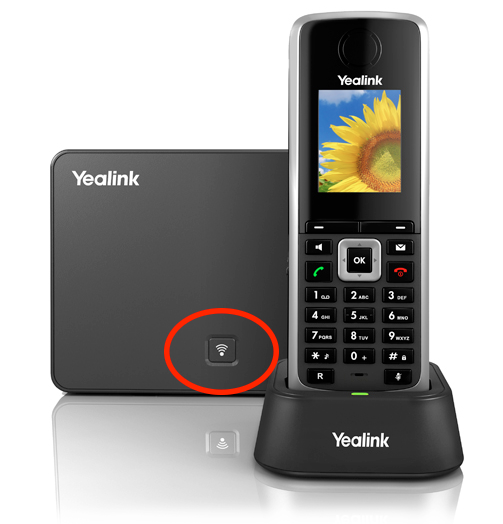
Connect your router with the supplied Ethernet network cable to the ethernet port found on the Yealink's base station. Then plug the supplied power cable into the base station.
Wait 60 seconds after plugging the base station's power adapter.
After 60 seconds press the Paging button located on the face of the base station, as indicated by the screen shot below:
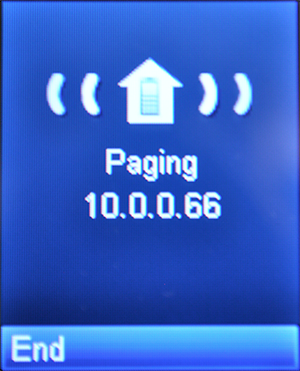
Once pressed, the IP address of the base station should be displayed on the handset, as indicated below:
We will now login to your device's web configuration interface. Enter the displayed IP address into your favorite browser. You should now see a page that looks like this:

Enter the system username/ password on the given field. The default system credentials should be admin for both the username and the password.
After entering the system credentials and clicking the Confirm button, you should see a screen that looks similar to the one below:
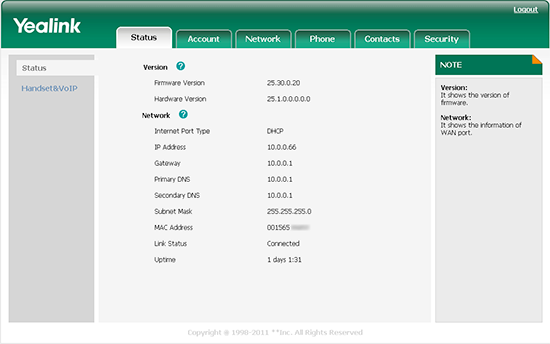
We're now ready to configure your Callcentric account information.
|
| STEP 2 |
Configuring your Callcentric account |
|
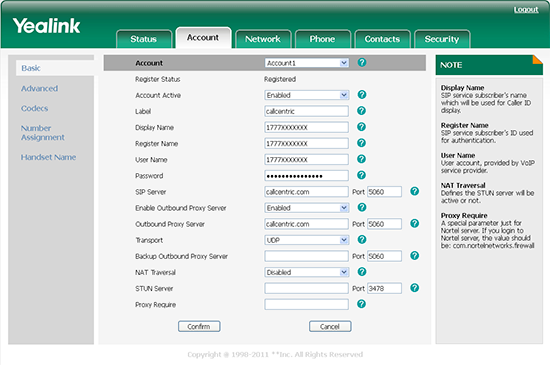
To configure your Callcentric account settings, from the main splash above, please click on the Account tab and select the first available line from the Accounts drop-down menu.
Once you have selected your desired line, please use the following settings:
| |
| Setting | Value |
| Account Active: | Enabled |
| Label: | Callcentric |
| Register Name: | This is either the default extension 1777MYCCID OR 1777MYCCIDEXT, where 1777MYCCID is the 1777 number assigned to you by Callcentric and EXT is the three digit extension you are trying to register this UA to.
For example: 17770001234101 would register to extension 101 on account 17770001234.
You cannot register to your account using only the extension number. |
| User Name: | This is either the default extension 1777MYCCID OR 1777MYCCIDEXT, where 1777MYCCID is the 1777 number assigned to you by Callcentric and EXT is the three digit extension you are trying to register this UA to.
For example: 17770001234101 would register to extension 101 on account 17770001234.
You cannot register to your account using only the extension number. |
| Password: | Enter your extension SIP Password here. Your extension SIP password is the password you created for the extension you are trying to use. You may edit the SIP password you wish to use in by logging into your My Callcentric account and clicking on the Extension menu link and then modifying the appropriate extension. |
| SIP Server: | sip.callcentric.net |
| SIP Server Port: | 5060 |
| Enable Outbound Proxy Server: | Enabled |
| Outbound Proxy Server: | sip.callcentric.net |
| Transport: | UDP |
| NAT Traversal: | Disabled |
Your configuration should look similar to the one shown in the picture below:
|
| STEP 3 |
Configuring extra settings |
|
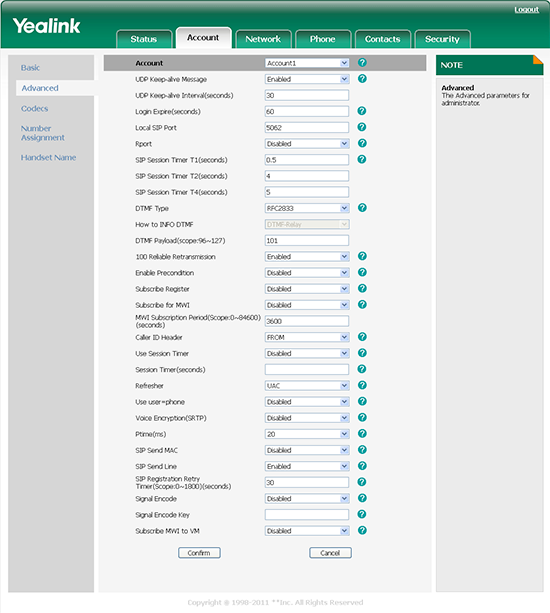
Next from the side menu bar, click on the Advanced link and ensure that you set the following options set from the default options:
| |
| Setting | Value |
| UDP Keep-alive Message: | Enabled |
| Login Expire(seconds): | 60 |
Your Advanced configurations page should look similar to the screenshot below:
|
| STEP 4 |
Configuring codec settings |
|
We want to make sure audio settings are configured properly. To do this click on the Codecs link on the side menu bar and from there, ensure that the PCMU and G729 are the only codecs listed under the Enabled Codecs listing. Your configuration should look similar to the one shown in the picture below:
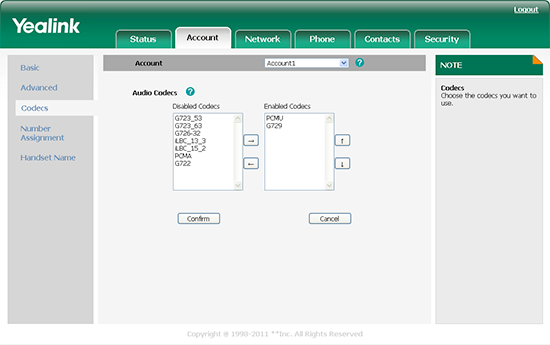
Once done, click the Confirm button to save your changes.
|
| STEP 4 |
That's it! You can now make a phone call. |
|
You can make a test call to 17771234567, or if you are signed up for one of Callcentric's rate plans you
can place a call to a traditional landline or mobile phone by dialing either:
1 + the area code and number for calls to the US
Or
011 + the country code, area code, and number for calls worldwide
(you may also use 00 instead of 011).
To test inbound calls from Callcentric to your Yealink installation, follow the directions listed in this FAQ.
|
|
|
