| GENERAL INFORMATION |
 |
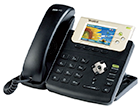 Yealink has emerged as one of the up and coming providers of affordable, high-quality VoIP communications equipment for the home and office. Their new product lineup features easy to use/elegant VoIP Hardware solutions at an affordable price. The T32G IP Phone has Dual-Port Gigabit Ethernet Connections, PoE Support, a crisp full-color screen, and much more. Overall, the T32G IP Phone is an excellent solution for business and home-office users. Yealink has emerged as one of the up and coming providers of affordable, high-quality VoIP communications equipment for the home and office. Their new product lineup features easy to use/elegant VoIP Hardware solutions at an affordable price. The T32G IP Phone has Dual-Port Gigabit Ethernet Connections, PoE Support, a crisp full-color screen, and much more. Overall, the T32G IP Phone is an excellent solution for business and home-office users.
|
|
| RESOURCES |
|
Websites:
Yealink homepage
Yealink T32G product page
Help / Support:
Yealink T32G product manual
|
|
| Configuring the Yealink T32G |
|
This guide is based on the Yealink T32G hardware version: 22.2.2.32.0.0.0 running firmware version: 32.70.0.106. If you are running a different revision some menus and settings may be different. These instructions are also based on using the T32G in its factory default configuration, which obtains a dynamic IP address automatically from your router using DHCP. For information on configuring your T32G with a static IP address please refer to the T32G user manual.
For the purpose of this guide we will use the web interface to add an account.
We recommend that you read each step through in its entirety before performing the action indicated in the step.
|
 | |
| STEP 1 |
Launching the Yealink T32G |
|
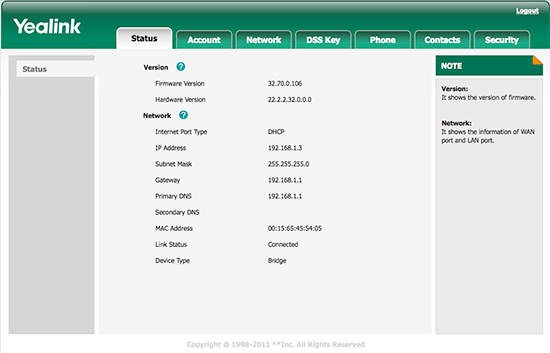
Make sure your phone is plugged into as proper power source, plugged into your ether net switch or router and has obtained a proper IP address. We will need to press the Menu soft button then select Status to obtain the IP address. Once you have the IP address you may enter it into your favorite browser to reach the phones splash page:
|
| STEP 2 |
Configuring your Callcentric account |
|
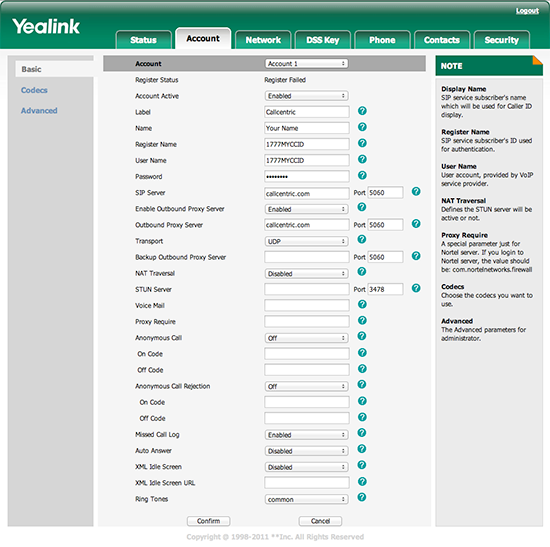
We will now create a profile and enter the required credentials, such as your Callcentric number, password and SIP server:
| |
| Setting | Value |
| Account Active: | Enabled |
| Label: | Callcentric |
| Register Name: | This is either the default extension 1777MYCCID OR 1777MYCCIDEXT, where 1777MYCCID is the 1777 number assigned to you by Callcentric and EXT is the three digit extension you are trying to register this UA to.
For example: 17770001234101 would register to extension 101 on account 17770001234.
You cannot register to your account using only the extension number. |
| User Name: | This is either the default extension 1777MYCCID OR 1777MYCCIDEXT, where 1777MYCCID is the 1777 number assigned to you by Callcentric and EXT is the three digit extension you are trying to register this UA to.
For example: 17770001234101 would register to extension 101 on account 17770001234.
You cannot register to your account using only the extension number. |
| Password: | Enter your extension SIP Password here. Your extension SIP password is the password you created for the extension you are trying to use. You may edit the SIP password you wish to use in by logging into your My Callcentric account and clicking on the Extension menu link and then modifying the appropriate extension. |
| SIP Server: | sip.callcentric.net |
| Enable Outbound Proxy Server: | Enabled |
| Outbound Proxy Server: | sip.callcentric.net |
Once you're done save your settings by clicking on Confirm at the bottom of the page.
Your configuration should look similar to the one shown in the picture below:
|
| STEP 3 |
Configuring codec settings |
|
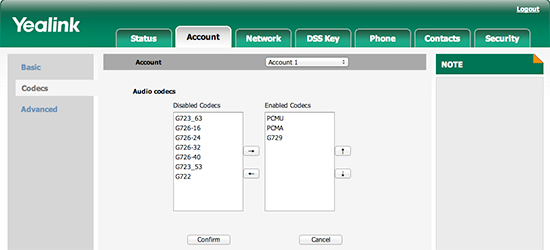
We will make sure that only the required codecs are configured at this time. To do so click on the Codecs link on the left side of the page, below Basic. Now make sure that ONLY PCMU, PCMA and G729 are enabled:
|
| STEP 4 |
That's it! You can now make a phone call. |
|
You can make a test call to 17771234567, or if you are signed up for one of Callcentric's rate plans you
can place a call to a traditional landline or mobile phone by dialing either:
1 + the area code and number for calls to the US

Or
011 + the country code, area code, and number for calls worldwide
(you may also use 00 instead of 011).
To test inbound calls from Callcentric to your Yealink installation, follow the directions listed in this FAQ.
|
|
|
