 | |
| STEP 1a |
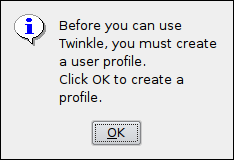
Open Twinkle. If this is your first time runnning Twinkle you will be prompted with a message stating Before you can use Twinkle you must create a user profile. Click OK to create a new profile. Once done move on to STEP 2.
|
| STEP 1b |
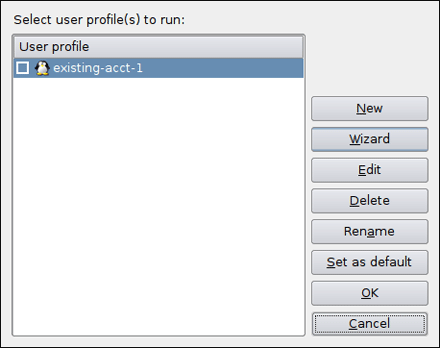
If you have other profiles already configured you will need to click File from the menu at the top of the application. Then click Change user.... Once the profle screen is displayed please move on to STEP 2 below.
|
| STEP 2 |
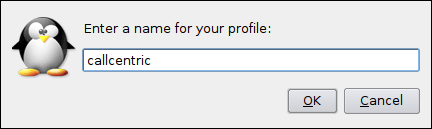
Click on the Wizard button in order to create your new Callcentric profile. In the next window enter callcentric as the profile name and click OK.
|
| STEP 3 |
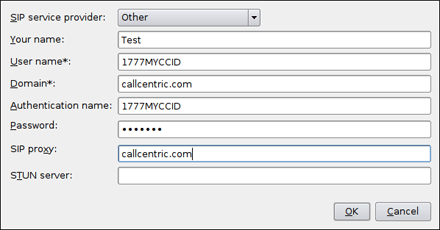
You will then be given the opportunity to configure your account settings. Fill in the fields with the information below:
| SIP Service Provider: | Other |
| Your Name: | Enter your name in this field |
| User name: | This is either the default extension 1777MYCCID OR 1777MYCCIDEXT, where 1777MYCCID is the 1777 number assigned to you by Callcentric and EXT is the three digit extension you are trying to register this UA to.
For example: 17770001234101 would register to extension 101 on account 17770001234.
You cannot register to your account using only the extension number. |
| Domain: | sip.callcentric.net |
| Authentication user name: | This is either the default extension 1777MYCCID OR 1777MYCCIDEXT, where 1777MYCCID is the 1777 number assigned to you by Callcentric and EXT is the three digit extension you are trying to register this UA to.
For example: 17770001234101 would register to extension 101 on account 17770001234.
You cannot register to your account using only the extension number. |
| Password: | Enter your extension SIP Password here. Your extension SIP password is the password you created for the extension you are trying to use. You may edit the SIP password you wish to use in by logging into your My Callcentric account and clicking on the Extension menu link and then modifying the appropriate extension. |
| SIP proxy: | sip.callcentric.net |
| STUN server: | Leave this field empty as you do not need a STUN server with the Callcentric service |
|
| STEP 4 |
If this is your first time configuring an account in Twinkle you will then be given the opportunity to adjust your system settings for this software. If this is your first time configuring Twinkle then you may configure your settings according to your desired preferences. Once done confirm your settings to save them.
|
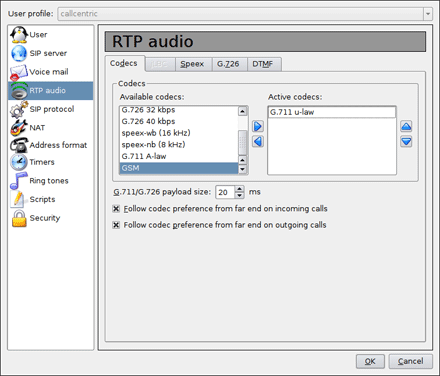
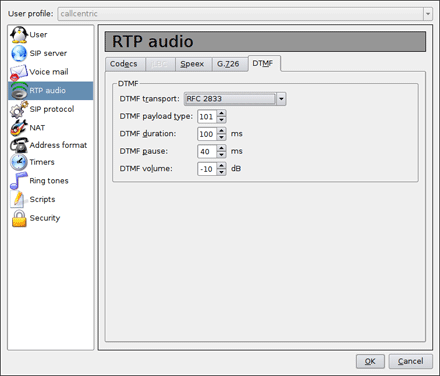
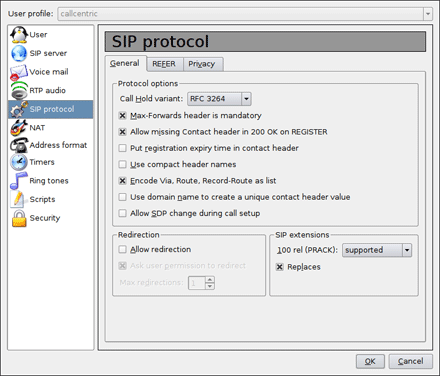
| STEP 5 |
This is the last configuration step of this guide. Here you will configure additional settings specific to your Callcentric account which will enable you to eliminate potential problems which may occur. To do this choose Edit from the application menu and perform the following. Once done click OK to save your changes.
Under RTP audio
Leave G.711 u-law as the only item under Active codecs
Set DTMF transpport to RFC 2833
Under SIP Protocol
Check MAX-Forwards header is mandatory
Uncheck Put registration expiry time in contact header
Uncheck Allow redirection
|
STEP 6
|
That's it! You can now make a phone call.
You can make a test call to 17771234567, or if you are signed up for one of Callcentric's rate plans you
can place a call to a traditional landline or mobile phone by dialing either:
1 + the area code and number for calls to the US
Or
011 + the country code, area code, and number for calls worldwide
(you may also use 00 instead of 011).
|
