 | |
| Step 1 |
Launching the snom m9 |
|
Make sure that your snom m9 is plugged in to both your power outlet and network. Also make sure that the handset you wish to use is properly registered to the base station. If your handset is not connected to the base station then double check to make sure that everything is connected normally.
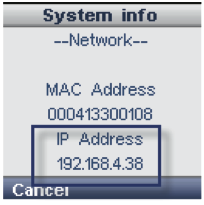
Once your handset is registered you will need to acquire the IP address of the m9. To do this:
- Press the center navigation button
- Activate the gear icon
- Go to the System Info menu item and press OK
Your IP should now be displayed similar to what is shown below:
Once you have the IP address you may now login to the device. Open your favorite browser and input the IP address from above and press enter. You will need to login. By default the username is admin and the password is admin, unless you changed it previously.
|
| Step 2 |
Configuring your Callcentric account |
|
We will now create a profile and enter the required credentials, such as your Callcentric number, password and SIP server. To do this click on the Identity you would like to configure from the left and configure the following option:
| |
| Setting | Value |
| Identity Active: | Callcentric |
| Server Type: | No specific server type |
| Display Name: | Your Name |
| Account: | This is either the default extension 1777MYCCID OR 1777MYCCIDEXT, where 1777MYCCID is the 1777 number assigned to you by Callcentric and EXT is the three digit extension you are trying to register this UA to.
For example: 17770001234101 would register to extension 101 on account 17770001234.
You cannot register to your account using only the extension number. |
| Registrar: | sip.callcentric.net |
| Outbound Proxy: | sip.callcentric.net |
| Authentication Name: | This is either the default extension 1777MYCCID OR 1777MYCCIDEXT, where 1777MYCCID is the 1777 number assigned to you by Callcentric and EXT is the three digit extension you are trying to register this UA to.
For example: 17770001234101 would register to extension 101 on account 17770001234.
You cannot register to your account using only the extension number. |
| Password: | Enter your extension SIP Password here. Your extension SIP password is the password you created for the extension you are trying to use. You may edit the SIP password you wish to use in by logging into your My Callcentric account and clicking on the Extension menu link and then modifying the appropriate extension. |
| Mailbox: | 1777MYCCID |
Your configuration should look similar to the one shown in the picture below:

Save your settings by clicking the Save button.
|
| Step 3 |
Configuring codec settings |
|
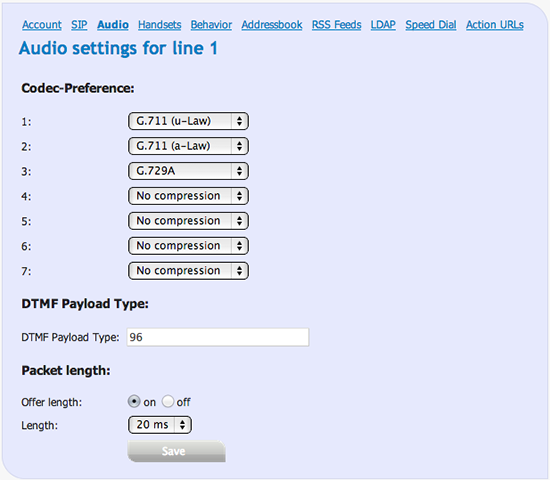
We will now configure the ideal codec configuration for use with Callcentric. To do this click on the Audio link for the Identity you selected previously. Then configure the following settings:
| |
| Setting | Value |
| Codec-Preference | G711 (u-law)
G711 (a-law)
G729A |
| DTMF Payload Type | 96 |
| Packet length | 20ms |
Your codecs should be configured similar to the following:
|
| Step 4 |
View Status |
|
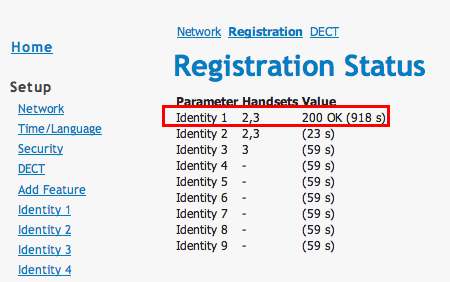
We will now check the status of the account registration. To do this click on the Status link on the left left and then select Registration. Make sure that the Identity you setup has 200 OK in the Value column as shown below:
|
| Step 5 |
That's it! You can now make a phone call. |
|
You can make a test call to 17771234567, or if you are signed up for one of Callcentric's rate plans you
can place a call to a traditional landline or mobile phone by dialing either:
1 + the area code and number for calls to the US
Or
011 + the country code, area code, and number for calls worldwide
(you may also use 00 instead of 011).
To test inbound calls from Callcentric to your GXP2200 installation, follow the directions listed in this FAQ.
|

 The snom m9/m9r is the successor to the snom m3 DECT IP phone system. The m9 brings welcome changes, better feeling buttons and stable performance for a DECT system that's easy to configure and easy to use. The m9 supports up to 9 different SIP accounts so you can have multiple Callcentric accounts under a single base station.