 |
Supported devices |
 |
|
|
| |
| OBi200/202 |
 |
| GENERAL INFORMATION |
 |
 The OBi202 is a two port ATA, with a built in router, from OBihai Technology Inc. This device contains two FXS ports for use witth your SIP providers. You may also purchase a wifi dongle which attaches seamlessly to the device's USB port and frees you from at least one ethernet cable.The device is simple to setup and can be configured and used in minutes. Additional advanced parameters are also available to end users through the admin interface. The OBi202 is a two port ATA, with a built in router, from OBihai Technology Inc. This device contains two FXS ports for use witth your SIP providers. You may also purchase a wifi dongle which attaches seamlessly to the device's USB port and frees you from at least one ethernet cable.The device is simple to setup and can be configured and used in minutes. Additional advanced parameters are also available to end users through the admin interface.
The OBi202 product page and user manual can be found here.
The information below is based on version 3.0.0 (Build: 3184M) for the OBi202.
You may also use this guide to assist you with configuration of similar OBihai products.
|
|
| RESOURCES |
|
Websites:
OBihai web page
Help / Support:
OBihai support page
Manual and documentation
Please note that if you choose to use the tool below voluntarily that you would providing your login information to a third party. If you are aware of and accept this then you may follow the links below to asssit you with configuration. Otherwise you may move to Step 1 of this setup guide..
OBihai provides a Callcentric wizard on both the obihai.com and obitalk.com websites where Callcentric customers can easily input their Callcentric username and password, press Submit and start making calls.
A visual guide can be folowed by clicking here.
The obihai.com wizard is here.
The obitalk.com wizard can also be found in the Device Configuration area for your OBi - log-in to www.obitalk.com required.
If you have configured your deive using any of the methods above DO NOT follow the instructions below. Instead please use the obitalk.com interface to manage your device.
|
|
| Configuring the OBi202 |
|
If you opt to configure the OBi via its internal web page, the following information in this guide, will assist you to do just that. If you need to factory reset your device please follow the instructions here.
In this guide we will go through configuring the OBi202 in order to register to the Callcentric servers so that you will be able to place and receive calls using your Callcentric account. Before moving forward please ensure you have properly added the device to your network by connecting it to your router or gateway. The device should be plugged in and the status lights should be green.
We recommend that you read each step through in its entirety before performing the action indicated in the step.
Note: This device supports many advanced options. Only the basic required ones are explored in this setup guide. If you need further help with any specific issue please let us know.
|
 | |
| STEP 1 |
Logging into your device |
|
- Dial ***0 from the phone connected to the OBi202
- Enter 30#
- Press 1 to Enter a New Value
- Press 1# to Enable
- Press 1 to Save
- Hang up
You have just enabled web access configuration for your device.
Next we will acquire the IP address of your device, if you haven't already done so. You can acquire the IP of your device by:
Picking up the connected handset and dialing *** and then dialing 1
You should be provided with the current IP address of your OBihai device. If your IP is 0.0.0.0 please make sure that your device is properly connected to your network.
Once you have acquired your IP login to your device by using http://DEVICE_IP/. If this is your first time logging into your device you may be asked to enter a username and password. By default for admin login this should be:
User: admin
Password: admin
If you do not have this information then you will need to either reset or acquire this login information. Unfortunately we would not be able to provide support on this topic. You may however visit the OBihai support page for your specific device.
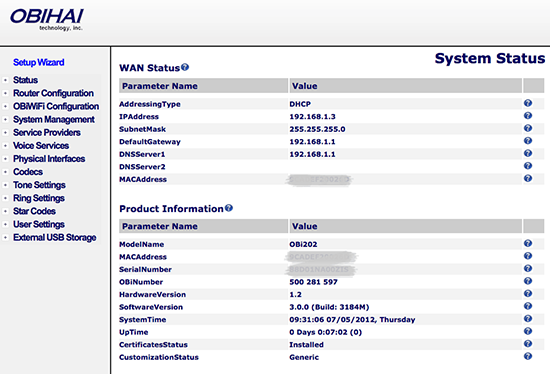
Once logged in you should see a screen similar to the one below:
|
| STEP 2 |
Disabling Provisioning |
|
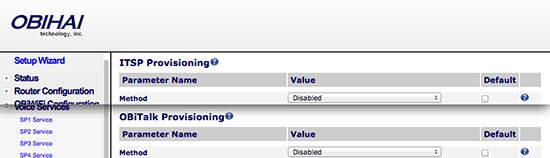
If you will be using Obihai's prvisioning servers for other services please skip this step and go onto step 3!
Since you are using this guide to configure your device we assume you do not wish to use Obihai's provisioning servers. If so please make sure to disabled them. We do this here because configurations may get overridden by automatic firmware updates... etc.
System Management > Auto Provisioning
Uncheck the following options under the Default column header and click Submit on the bottom and make sure the values are as follows:
| ITSP Provisioning |
| Parameter name | Value |
| Method | Disabled |
OBiTALK Provisioning |
| Parameter name | Value |
| Method | Disabled |
|
| STEP 3 |
Configuring your Callcentric account |
|
We will configure your Callcentric account on the desired Service Provider and Voice Services profile. Please select the matching profiles (A = 1, B = 2), ITSP Profile/SP Service, and enable and set the following options:
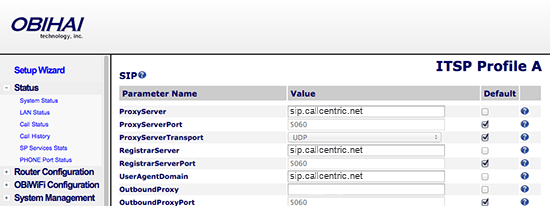
Service Providers > ITSP Profile > SIP
Uncheck the following options under the Default column header and click Submit on the bottom and make sure the values are as follows:
| Parameter name | Value |
| ProxyServer: | sip.callcentric.net |
| RegistrarServer: | sip.callcentric.net |
| UserAgentDomain: | sip.callcentric.net |
| OutboundProxy: | sip.callcentric.net |
| X_ProxyServerRedundancy: | Checked |
| X_SecondaryRegistration: | Checked |
Service Providers > ITSP Profile > General
Uncheck the following under the Default column header and click Submit on the bottom and make sure the values are as follows:
| Parameter name | Value |
| Name | Your Desired Name, or your 1777 number |
| DigitMap | (*xx.|**275*x.|[3469]11|1xxxxxxxxxx|<1>[2-9]xxxxxxxxx|011xx.|xx.|(Mipd)|[^*#]@@.) |

Next we will configure your Voice Services information by entering your username and password.
Voice Services > SP Service
Uncheck the following under the Default column header and click Submit on the bottom and make sure the values are as follows:
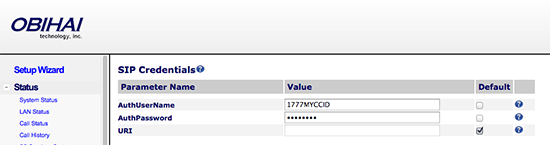
| Parameter name | Value |
| AuthUserName: | This is either the default extension 1777MYCCID OR 1777MYCCIDEXT, where 1777MYCCID is the 1777 number assigned to you by Callcentric and EXT is the three digit extension you are trying to register this UA to.
For example: 17770001234101 would register to extension 101 on account 17770001234.
You cannot register to your account using only the extension number. |
| AuthPassword: | Enter your extension SIP Password here. Your extension SIP password is the password you created for the extension you are trying to use. You may edit the SIP password you wish to use in by logging into your My Callcentric account and clicking on the Extension menu link and then modifying the appropriate extension. |
| X_KeepAliveEnable: | Checked |
| X_KeepAliveExpires: | 120 |
Once you have saved your changes you will want to click on the Reboot button at the top right of the page to reboot your device and allow it to register to your Callcentric account.
Once the device has rebooted you will see that your configured Profile has been registered properly:

|
| STEP 4 |
That's it! You can now make a phone call. |
|
You can make test calls to 17771234567, or if you are signed up for one of Callcentric's rate plans you can place a call to a traditional landline or mOBile phone by dialing either:
1 + the area code and number for calls to the US
Or
011 + the country code, area code, and number for calls worldwide
(you may also use 00 instead of 011).
|
|
|
|
