| 1 |
Accessing the SIP configuration menu |
|
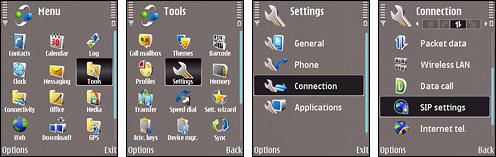
We will now navigate to the SIP configuration application in your device.
- Please begin by accessing your phone's menu. This is normally done through a soft menu option or by using the dedicated menu button
- After choosing the menu option you should be presented with various choices. Please select the Tools option
- Then select the Settings option
- You will then want to choose the Connection option
- And finally you will have arrived at the SIP settings menu option
|
| 2 |
Beginning SIP configuration |
|
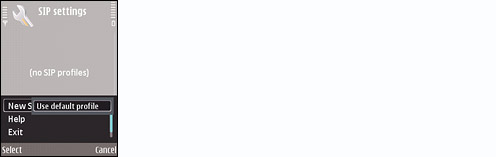
Once you are in the SIP settings configuration screen you will be given the ability to create a new profile, if you do not already have one. To do so:
- Press the Select soft button
- Then select New SIP Profile and choose Use default profile
|
| 3 |
Basic profile settings |
|
We will now begin configuring the basic settings you will need for your profile. Please configure the following options:
|
| Profile name: | callcentric |
| Service profile: | IETF |
| Default access point: | None (or your desired access point) |
| Public username: | This is either the default extension 1777MYCCID OR 1777MYCCIDEXT, where 1777MYCCID is the 1777 number assigned to you by Callcentric and EXT is the three digit extension you are trying to register this UA to.
For example: 17770001234101 would register to extension 101 on account 17770001234.
You cannot register to your account using only the extension number. |
| Use compression: | No |
| Registration: | When needed (or your desired setting) |
| Use security: | No |
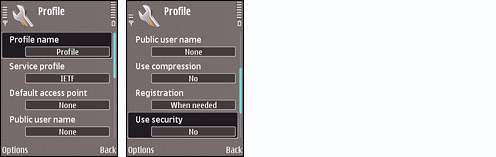
Once the above settings have been configured please move on to the next step.
|
| 4 |
Configuring the Proxy server settings |
|
Now that we have configured the basic settings we will need to configure some other options. We will begin with the Proxy settings. To do this select the Proxy server option from the list and configure the following settings:
|
| Proxy Server Address: | sip:sip.callcentric.net |
| Realm: | sip.callcentric.net |
| User name: | This is either the default extension 1777MYCCID OR 1777MYCCIDEXT, where 1777MYCCID is the 1777 number assigned to you by Callcentric and EXT is the three digit extension you are trying to register this UA to.
For example: 17770001234101 would register to extension 101 on account 17770001234.
You cannot register to your account using only the extension number. |
| Password: | Enter your extension SIP Password here. Your extension SIP password is the password you created for the extension you are trying to use. You may edit the SIP password you wish to use in by logging into your My Callcentric account and clicking on the Extension menu link and then modifying the appropriate extension. |
| Allow loose routing: | Yes |
| Transport type: | UDP |
| Port: | 5060 |
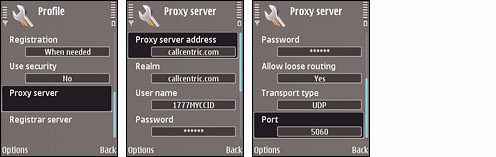
Once done move onto the next step which is configuring your Registrar server.
|
| 5 |
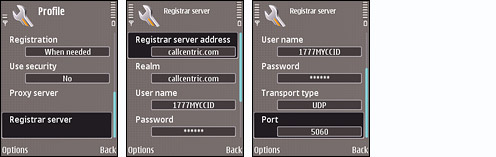
Configuring the Registrar server settings |
|
Configuring the Registrar server settings is pretty much the same as configuring the Proxy server settings. You can configure the settings below after selecting the Registrar server option:
|
| Registrar Server Address: | sip:sip.callcentric.net |
| Realm: | sip.callcentric.net |
| User name: | This is either the default extension 1777MYCCID OR 1777MYCCIDEXT, where 1777MYCCID is the 1777 number assigned to you by Callcentric and EXT is the three digit extension you are trying to register this UA to.
For example: 17770001234101 would register to extension 101 on account 17770001234.
You cannot register to your account using only the extension number. |
| Password: | Enter your extension SIP Password here. Your extension SIP password is the password you created for the extension you are trying to use. You may edit the SIP password you wish to use in by logging into your My Callcentric account and clicking on the Extension menu link and then modifying the appropriate extension. |
| Transport type: | UDP |
| Port: | 5060 |
|
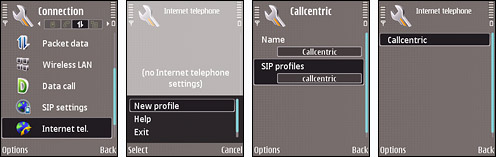
| 6 |
Configuring the Registrar server settings |
|
We are almost there. Currently we need to configure a Callcentric calling profile for use with your Nokia device. This profile can be activated whenever it is needed, or used automatically with the former being the preferred option. To configure a Callcentric Internet calling profile:
- Go back to the Connection menu and choose the Internet tel. Option
- Select Options and choose New profile
- Name the profile Callcentric and choose the callcentric SIP profile as the calling profile
- Once done you may navigate back to your main menu or go back to your standby screen
|
| 7 |
Connecting to your SIP account |
|
This is one of the most flexible, and probably confusing, part of configuring your Nokia device. When it comes to using the account you just created you have various options. You may set the account to always connect (Option A) to your Callcentric account or you may connect only when necessary (Option B). We highly recommend setting your phone to connect only when needed as registration may be unstable if configured for always connecting and may drain battery life.
*Please note that if you wish to use your GSM/Edge or 3G connection you will need to use Option A and set your Default access point to your cellphones data connection. Keep in mind our disclaimer regarding GSM/Edge or 3G connections not being stable due to latency issues.
Option A - To connect automatically you will simply need to change the setting Registration, found in the Basic settings part of your SIP configuration, to Always. Note that you will also have to set your Default access point, preferably to a wireless connection.
Option B � To configure your device to connect manually you will simply need to access your Internet telephone application and activate the configured Callcentric profile over your desired network connection. To do this:
- Please begin by accessing your phone's menu. This is normally done through a soft menu option or by using the dedicated menu button
- After choosing the menu option you should be presented with various choices. Please select the Connectivity option
- Then select the Internet tel. Option
- You should be presented with the available wireless networks within your area. Select the one you wish to use
- Select Options then select Connect to service and choose the Callcentric profile you configured in the previous step
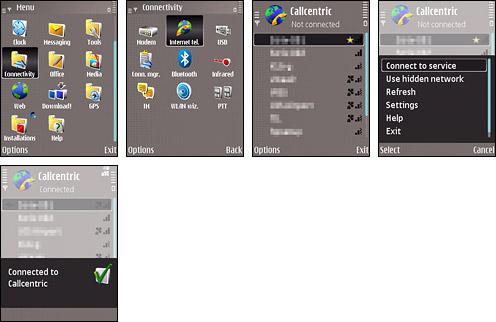
You should be presented with a confirmation dialog stating that you successfully connected to Callcentric.
|
| 8 |
That's it! You can now make a phone call. |
|
You can make a test call to 17771234567, or if you are signed up for one of Callcentric's rate plans you
can place a call to a traditional landline or mobile phone by dialing either:
1 + the area code and number for calls to the US
Or
011 + the country code, area code, and number for calls worldwide
(you may also use 00 instead of 011).
|

 This guide will assist you with the general steps needed to configure Nokia's Symbian based devices, however it may also be used for other devices such as Maemo based phones. Please note that we do not guarantee full functionality for the SIP applications in these phones. This guide is only provided for those who wish to experiment, and potentially use, these devices. Ideally you will want to use a wifi connection with these features.