 | |
STEP 1
|
Connect your router with the supplied Ethernet network cable to the PAP2. Now connect your phone to the PAP2 Line 1 port. Finally plug the supplied power cable into the PAP2.
|
STEP 2
|
Wait 60 seconds after plugging your PAP2 in.
|
STEP 3
|
Pickup the phone connected to the PAP2 and dial the * key on your
phone 4 times.
|
STEP 4
|
Have a pen and paper ready. You will hear a message - "Configuration menu. Please enter option followed by the pound key...", then enter 1 1 0 # on your phone. You will now hear a message giving you the IP address of your PAP2 such as - "192.168.1.100 write this number down.
|
STEP 5
|
Open a web browser on your computer such as Internet Explorer and enter the IP address you heard in step 4 as the address (I.E. where you would normally enter www.yahoo.com).
Please note: some browsers will require you to remove leading zero's ( 0 's ) in the IP address. For example if you heard "192.168.001.010" you should change this to "192.168.1.10".
|
STEP 6
|
Please note, the PAP2 by default does not have a password assigned to it, so you should now see a page that looks like this:
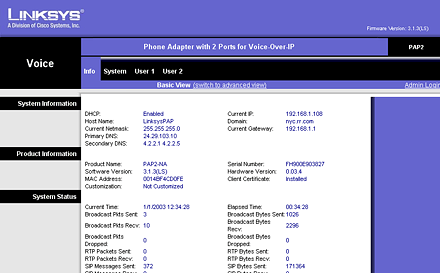
If you are prompted to enter the username and password please enter it and you should see the image above.
|
STEP 7
|
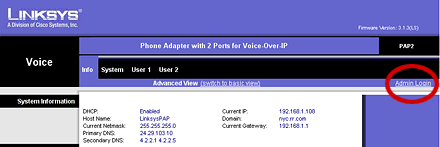
Now click on the "Admin Login" link as indicated in the picture below:
|
STEP 8
|
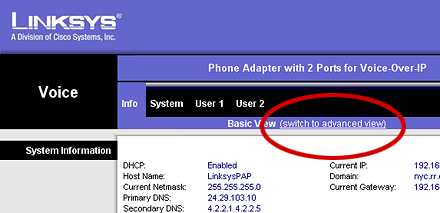
Now click on the "(switch to advanced view)" link as indicated in the
picture below:
|
STEP 9
|
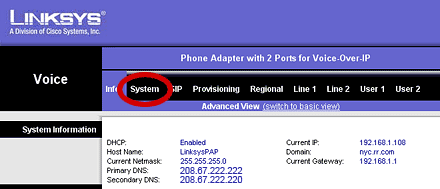
Click the tab labeled "System" in the menu at the top:
|
STEP 10
|
Enter time servers and DNS servers as indicated below:
- Set your Primary DNS server to a public DNS server such as 208.67.222.222. You can also set your Secondary DNS server to a
public DNS server such as 208.67.222.220
- Set your Primary NTP Server to 0.pool.ntp.org, or your preferred working NTP server. You can also
add a Secondary NTP Server if you wish
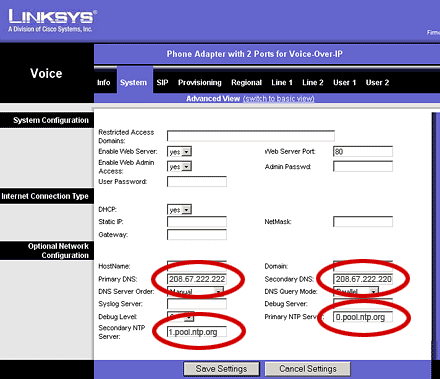
Click the "Save Settings" button after you have entered the time servers. The web page will display a
screen for a few seconds stating that it is saving the changes you made.
|
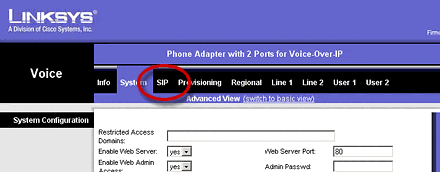
STEP 11
|
Click on the SIP tab from the main menu.
Scroll down to SDP Payload Types section.
Set the following values:
RTP Packet Size: 0.020
G729a Codec Name: G729
G729b Codec Name: G729
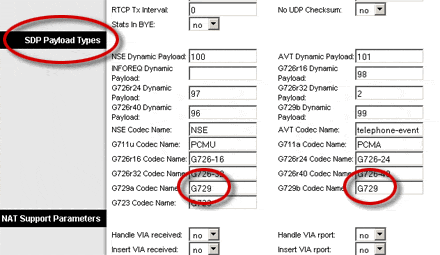
Click the "Save Settings" button once you are done to save these changes.
|
STEP 12
|
Click the tab labeled "Regional" in the menu at the top. You will now be shown the
Regional page. Scroll to the bottom of the Regional page. In the "Time Zone" field select the number of hours
plus or minus that your local time is offset from Greenwich Mean Time (GMT).
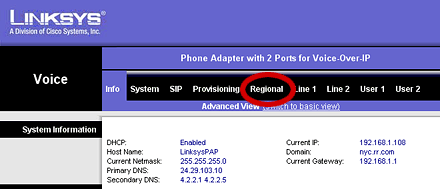
Click the "Save Settings" button after you have selected the time zone.
|
STEP 13
|
Below we outline the steps assuming the use of Line 1.
Note: Now we will setup the line you will use Callcentric with. Normally if you are using the PAP2 only with Callcentric you would use
Line 1 by clicking the "Line 1" tab which is how the example below is shown. If you already have another provider configured on Line 1,
use Line 2 instead by clicking the "Line 2" tab. You may also configure Callcentric on both Line 1 and Line 2 by first setting up Line 1
following the directions below; and then repeating the step identically but in the "Line 2" tab.
Click the tab labeled "Line 1"
|
STEP 14
|
Within the Line 1 page is where most of the settings will be configured. Below is a list of the settings that
need to be changed from the default configuration; you can click the screenshot below to see the full page of settings in detail.
| NAT SETTINGS |
| NAT Mapping Enable | yes |
| NAT Keep Alive Enable | yes |
PROXY AND REGISTRATION |
| Proxy | Enter sip.callcentric.net in this field |
| Outbound Proxy | Enter sip.callcentric.net in this field |
| Use Outbound Proxy | yes |
| Use DNS SRV | yes |
| DNS SRV Auto Prefix | yes |
SUBSCRIBER INFORMATION |
| User ID | This is either the default extension 1777MYCCID OR 1777MYCCIDEXT, where 1777MYCCID is the 1777 number assigned to you by Callcentric and EXT is the three digit extension you are trying to register this UA to.
For example: 17770001234101 would register to extension 101 on account 17770001234.
You cannot register to your account using only the extension number. |
| Password | Enter your extension SIP Password here. Your extension SIP password is the password you created for the extension you are trying to use. You may edit the SIP password you wish to use in by logging into your My Callcentric account and clicking on the Extension menu link and then modifying the appropriate extension. |
| Auth ID | This is either the default extension 1777MYCCID OR 1777MYCCIDEXT, where 1777MYCCID is the 1777 number assigned to you by Callcentric and EXT is the three digit extension you are trying to register this UA to.
For example: 17770001234101 would register to extension 101 on account 17770001234.
You cannot register to your account using only the extension number. |
| Use Auth ID | yes |
AUDIO CONFIGURATION |
| Preferred Codec | G711u |
| DTMF Tx Method | Auto |
DIAL PLAN |
Within the Dial Plan delete ALL of the current setting and replace it with the following by copying
the text below and pasting it into the Dial Plan field:
(*xx.|*xxx|*75xx|[3469]11|0|00|1xxx[2-9]xxxxxxS0|xxxxxxxxxxxx.|**275*x.)
|
Click here to see the PAP2/Version 3 firmware picture
Click here to see the PAP2T/Version 5 firmware picture
Click the "Save Settings" button after you have finished entering all information on the Line 1 page.
|
STEP 15
|
At this point your PAP2 should be registered (connected) to our servers. You can verify that your PAP2 is
successfully setup in ANY of the following ways:
- Click the "Info" tab in the top menu. Under the "Line 1 Status" section on the Info page you should see "Online" next to
the "Registration State" field.
- The light next to the Line 1 on the front of your PAP should be on.
- You should have dial tone on Line 1 when you pickup the phone.
If you do not see your PAP2 as registered, you should re-verify all steps in the setup process above. Make sure you have entered all
settings correctly.
|
STEP 16
|
That's it! You can now make a phone call.
You can make a test call to 17771234567, or if you are signed up for one of Callcentric's rate plans you
can place a call to a traditional landline or mobile phone by dialing either:
1 + the area code and number for calls to the US
Or
011 + the country code, area code, and number for calls worldwide
(you may also use 00 instead of 011). |
