| GENERAL INFORMATION |
 |
 Innomedia's BuddyTalk 110 (BT110) is a smart speaker that combines the power of Amazon's Alexa Voice Service (AVS) and VoIP Technologies in a single device. Innomedia's BuddyTalk 110 (BT110) is a smart speaker that combines the power of Amazon's Alexa Voice Service (AVS) and VoIP Technologies in a single device.
Note: Call Waiting and 3-Way Calling are NOT currently supported on this device.
|
|
| RESOURCES |
|
Websites:
BuddyTalk Homepage
BuddyTalk BT110 Product Page
Help / Support:
BT110 FAQs
BT110 Support
BT110 Setup Guide
BT110 Specifications
BT110 Features & Functionality
|
|
| Configuring the BuddyTalk BT110 |
|
These instructions are based on BuddyTalk BT110 firmware version 1.0.6.5. If you are running a different firmware version, some menus/settings may be different. These instructions are also based on using the BT110 in its factory default configuration, which obtains a dynamic IP address automatically from your router using DHCP.
In this guide we will go through configuring the BT110 in order to register to the Callcentric servers, so that you will be able to place and receive calls using your Callcentric account. Before proceeding, please ensure that you have properly added the device to your network by connecting it to your router or gateway.
Note: Although this device supports many advanced features/options, this guide will only detail the specific settings which are required to establish basic connectivity between your BT110 and our service. If you need additional assistance with any specific issue, please let us know.
This guide assumes that you're BT110 is properly connected to your wired or wireless network and that you've used the BuddyTalk App (for iOS or for Android) to create an association between your Amazon Account and the device, so that the Alexa Voice Features will work. If you have not done so already, please visit the following page for further instructions.
|
 | |
| Step 1 |
Configuring your Callcentric account |
|
After you've connected the BT110 to your network and have created the association between your BT110 and your Amazon Account, open the BuddyTalk App on your Android/iOS device and select Setup Telephony.
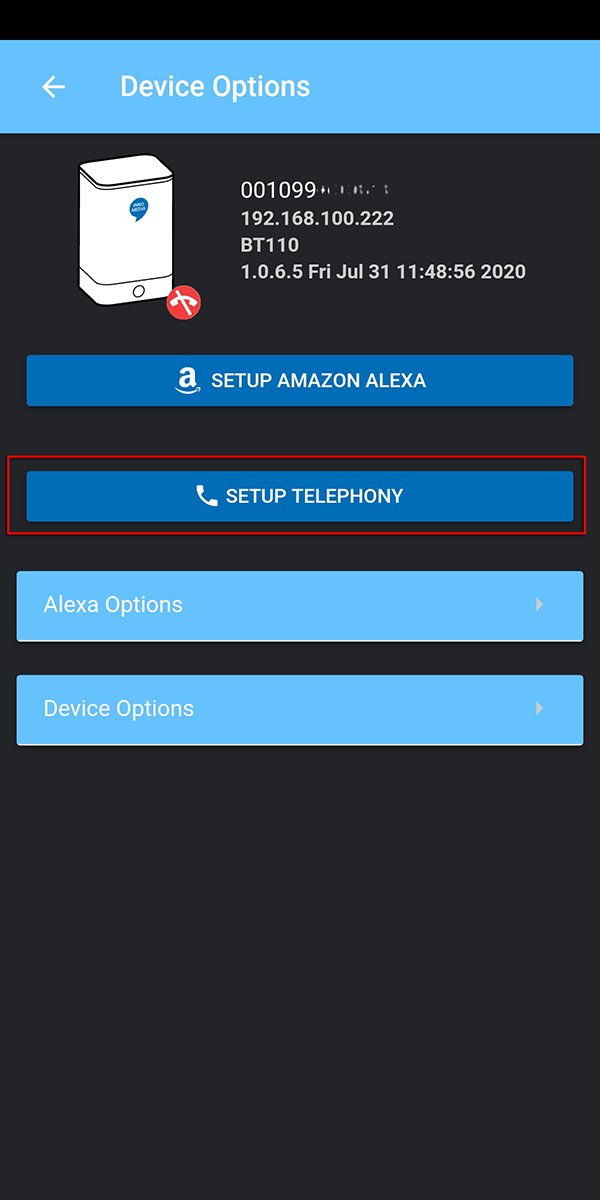
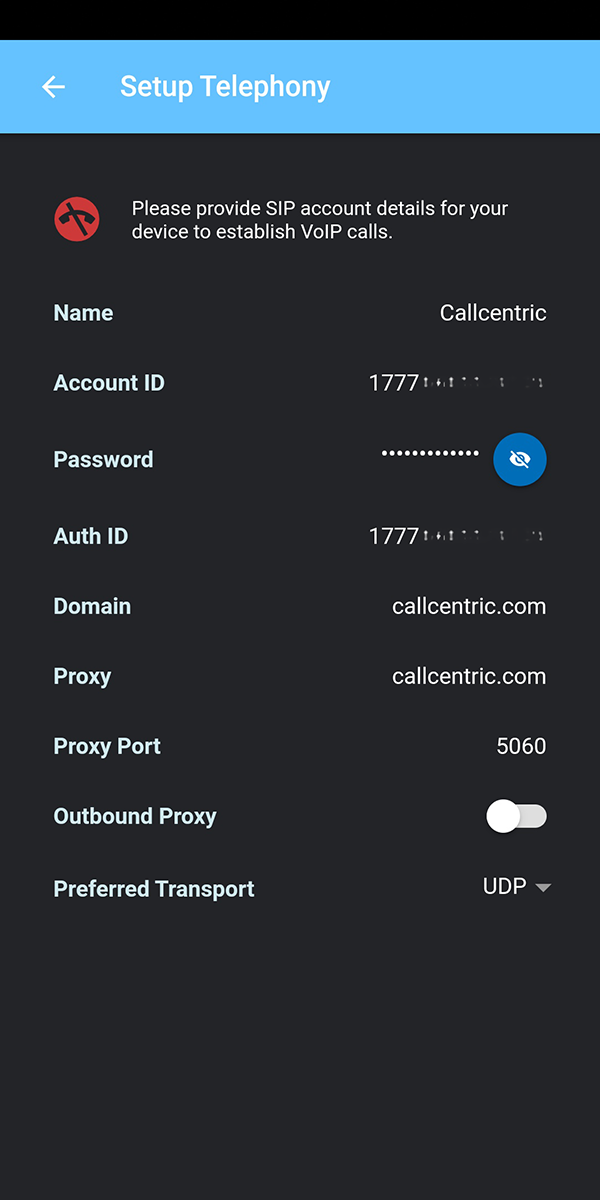
On this screen, you should be greeted with the basic telephony options, where you can specify your Callcentric Account information. To register your device to our service, please configure your settings in-line with those detailed in the screenshot below:
| |
| Setting | Value |
| Name | Callcentric |
| Account ID | This is either the default extension 1777MYCCID OR 1777MYCCIDEXT, where 1777MYCCID is the 1777 number assigned to you by Callcentric and EXT is the three digit extension you are trying to register this UA to.
For example: 17770001234101 would register to extension 101 on account 17770001234.
You cannot register to your account using only the extension number. |
| Password | Enter your extension SIP Password here. Your extension SIP password is the password you created for the extension you are trying to use. You may edit the SIP password you wish to use in by logging into your My Callcentric account and clicking on the Extension menu link and then modifying the appropriate extension. |
| Account ID | This is either the default extension 1777MYCCID OR 1777MYCCIDEXT, where 1777MYCCID is the 1777 number assigned to you by Callcentric and EXT is the three digit extension you are trying to register this UA to.
For example: 17770001234101 would register to extension 101 on account 17770001234.
You cannot register to your account using only the extension number. |
| Domain | sip.callcentric.net |
| Proxy | sip.callcentric.net |
| Proxy Port | 5060 |
| Outbound Proxy | disabled/off |
| Preferred Transport | UDP |
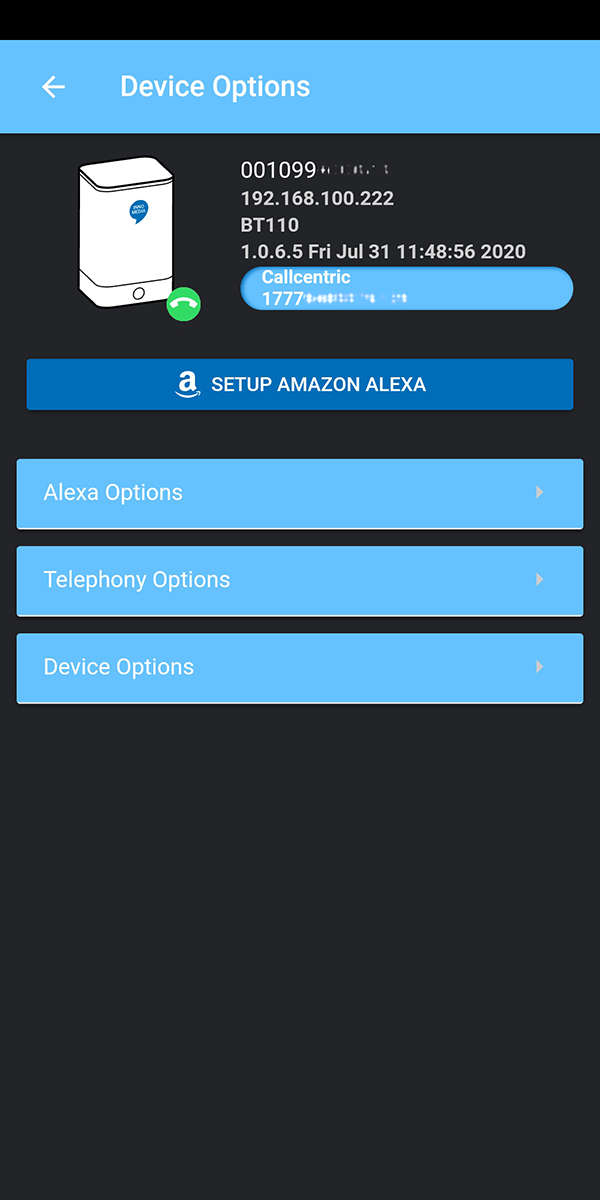
Once you've entered/saved the settings detailed above, you should see a green telephone icon near the top of the BuddyTalk App's main interface, indicating your device has been successfully registered/connected to our service. If the telephone icon is red, you will need to review and update your configuration settings.
|
| Step 2 |
Additional settings |
|
Use the BuddyTalk App to locate the IP Address of your device (located on the top of the Device Options screen, usually in the format of 192.168.xxx.xxx).
Login to your device by opening a web browser on your computer (such as Chrome or Firefox) and entering the IP Address retrieved from the previous step into the address bar (I.E. where you would normally enter "www.yahoo.com").
You should now see a page that looks like this:
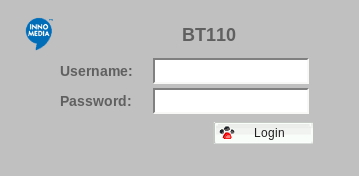
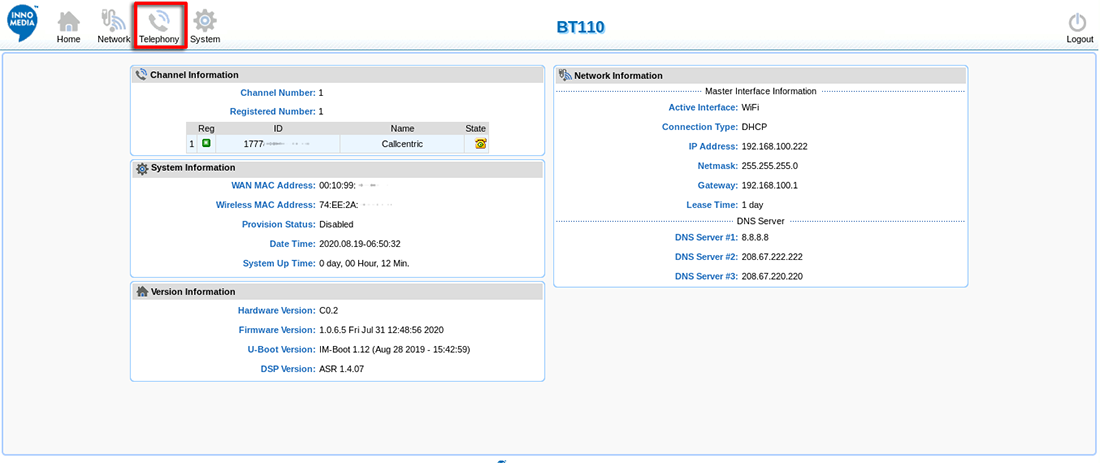
Locate the username/password on the bottom of your device, enter them into the appropriate fields and click the Login button. After doing so, you will be directed to the device's administrative dashboard. Select the Telephony option from the top navigation bar of the administrative dashboard, as indicated by the screenshot below:
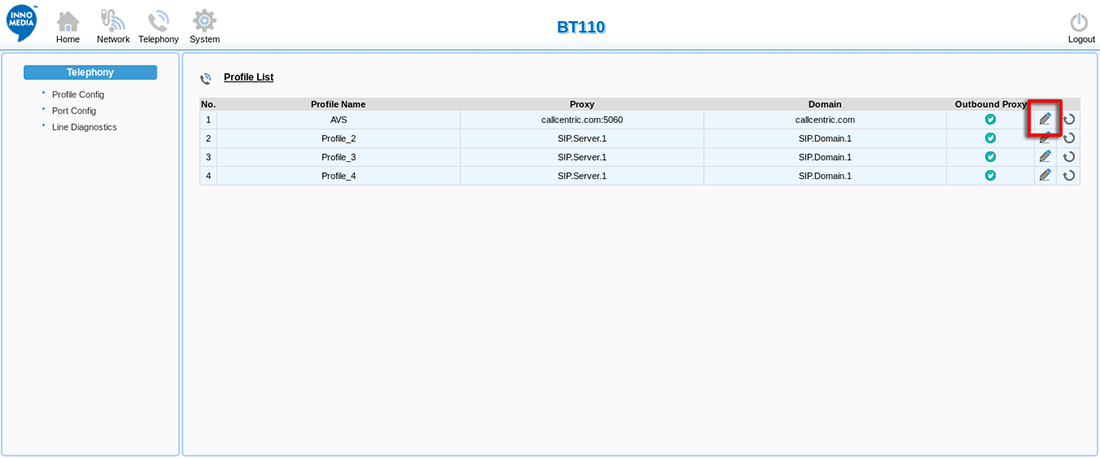
In the Telephony Section, locate the profile your device automatically created during the initial setup process (it should be labeled AVS) and click on the pencil icon, as indicated by the screenshot below:
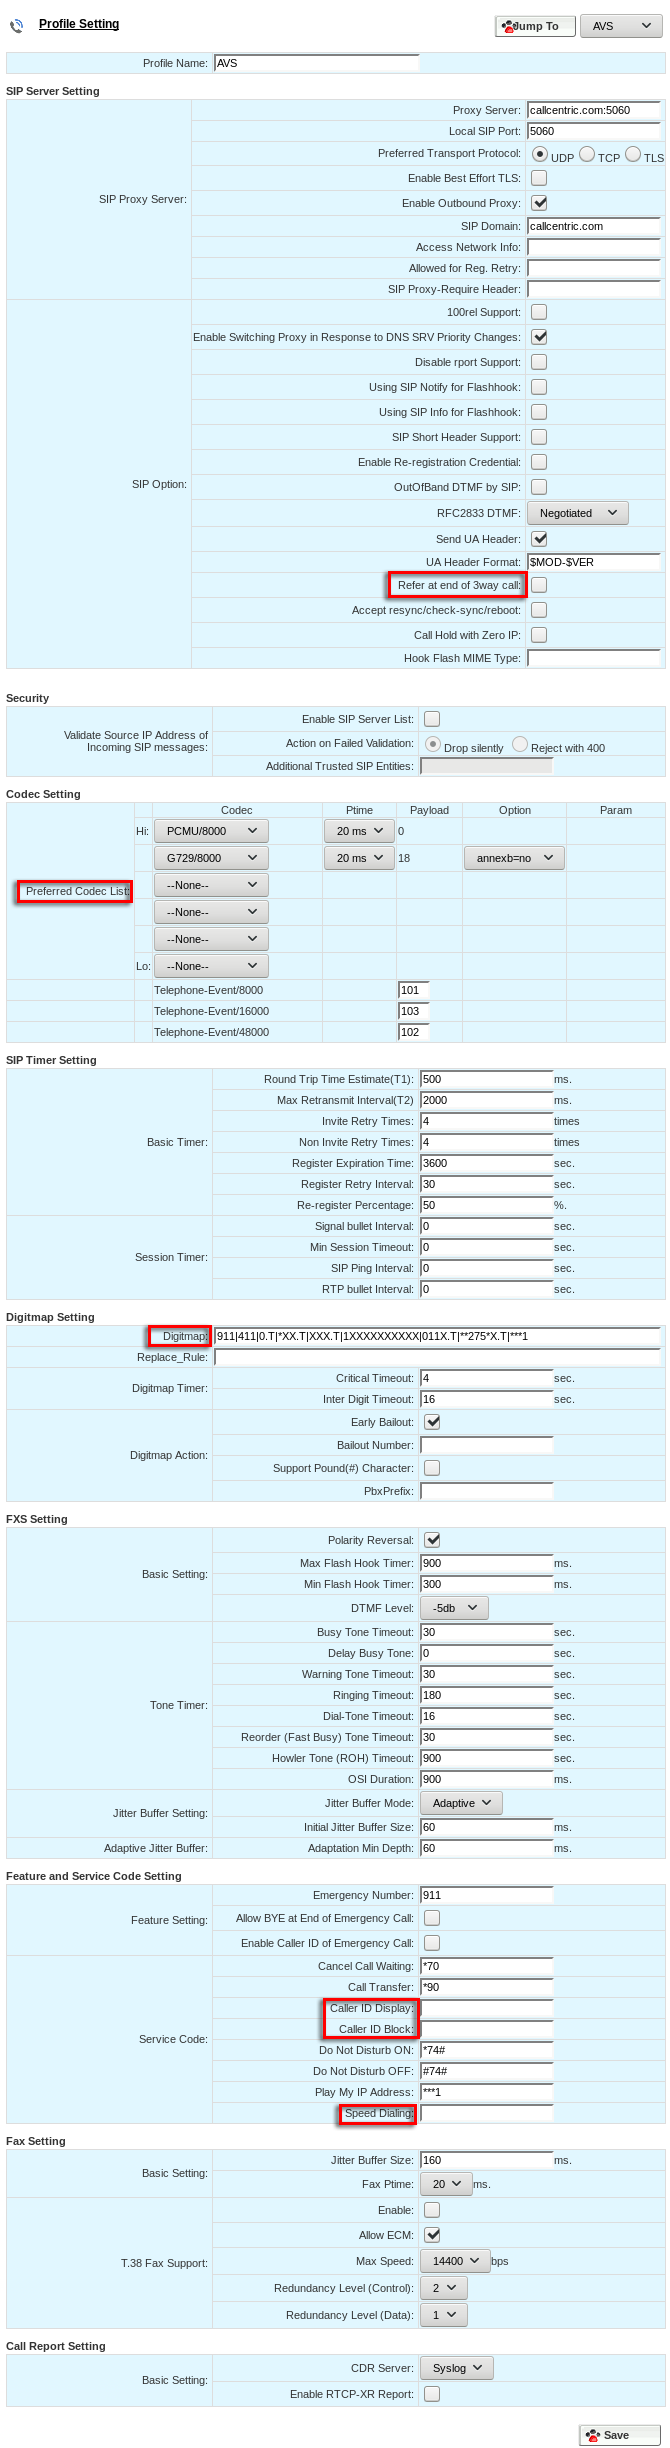
You will need to configure the following options within this page, as indicated by the screenshot below:
| |
| Setting | Value |
| Refer at end of 3way call | disabled/unchecked |
| Preferred Codec List | 1 - PCMU/8000 - 20ms
2 - G729/8000 - 20ms |
| Digitmap | 911|411|0.T|*XX.T|XXX.T|1XXXXXXXXXX.T|011X.T|**275*X.T|***1 |
| Caller ID Display | this setting should be blank/no value |
| Caller ID Block | this setting should be blank/no value |
| Speed Dialing | this setting should be blank/no value |
|
| Step 3 |
That's it! You can now make a phone call |
|
You can make a test call to 17771234567, or if you are signed up for one of Callcentric's rate plans you can place a call to a traditional landline or mobile phone by dialing either:
1 + the area code and number for calls to the US
Or
011 + the country code, area code, and number for calls worldwide (you may also use 00 instead of 011).
|
|
|
