| GENERAL INFORMATION |
 |
 Grandstream's DP752 is a cost effective, cordless phone system that is fantastic for both residential and SMB installs. The DP752 system supports up to 5 handsets (DP730/DP722) and utilizes DECT technology to ensure excellent sound quality and range. Grandstream's DP752 is a cost effective, cordless phone system that is fantastic for both residential and SMB installs. The DP752 system supports up to 5 handsets (DP730/DP722) and utilizes DECT technology to ensure excellent sound quality and range.
|
|
| RESOURCES |
|
Websites
Grandstream Homepage
Grandstream DP722 Product Page
Grandstream DP730 Product Page
Grandstream DP752 Product Page
Help/Support
DP752/730/722 Product Manual
|
|
| Configuring the DP752/DP730/DP722 |
|
These instructions are based on Grandstream DP752 firmware revision 1.0.11.2. If you are running a different firmware version, some of the menus and settings may be different. These instructions are also based on using the DP752 in its factory default configuration, which obtains a dynamic IP address automatically from your router using DHCP. For information on configuring your DP752 with a Static IP address, please refer to the DP752 user manual.
In this guide we will go through configuring the DP752 in order to register to the Callcentric servers, so that you will be able to place and receive calls using your Callcentric account. Before proceeding, please ensure that you have properly added the device to your network by connecting it to your router or gateway.
We recommend reading each step through in its entirety before performing the action(s) indicated within the step.
Note: Although this device supports many advanced features/options, this guide will only detail the specific settings which are required to establish basic connectivity between your DP752 and our service. If you need additional assistance with any specific issue please let us know.
|
 | |
| Step 1 |
Pairing to the base station |
|
By default, your handset (either the DP730 or DP722) is not paired with the DP752 (the base station). To pair your handset(s) to your base station, please follow the instructions below. If your handset is already paired with your base station, please proceed to the "Step 2" of this guide.
Assuming the base station is fully powered and your handset is fully charged, press/hold the radio/page button on the base station (indicated by the icon).
Next, while the radio icon on the base station is blinking, go to the handset and press Menu. From there navigate to Settings >> Registration >> Register
From the Subscribe Base menu screen, select the base station you would like to connect to and select Subscribe
Once completed, if your handset has successfully paired with the base station; you should receive a Handset Subscribed notification on your handset's screen.
Note: If you run into any issues pairing your handset to your base station, please refer to the DP752 user manual for additional information.
|
| Step 2 |
Logging into your base station |
|
To login to your base station's web configuration interface, you will need to retrieve the IP address of your base station. To do so, from your handset, press the Menu key and navigate to Status >> Base Status.
Next, open a web browser on your computer (Chrome, Firefox, Internet Explorer, Safari, etc) and enter the IP address that is displayed on your phones LCD screen into the address bar.
Login to the DP752's administrative interface by using the default username admin and the default password, which is located on the back of the device itself.
|
| Step 3 |
Configuring your Callcentric account |
|
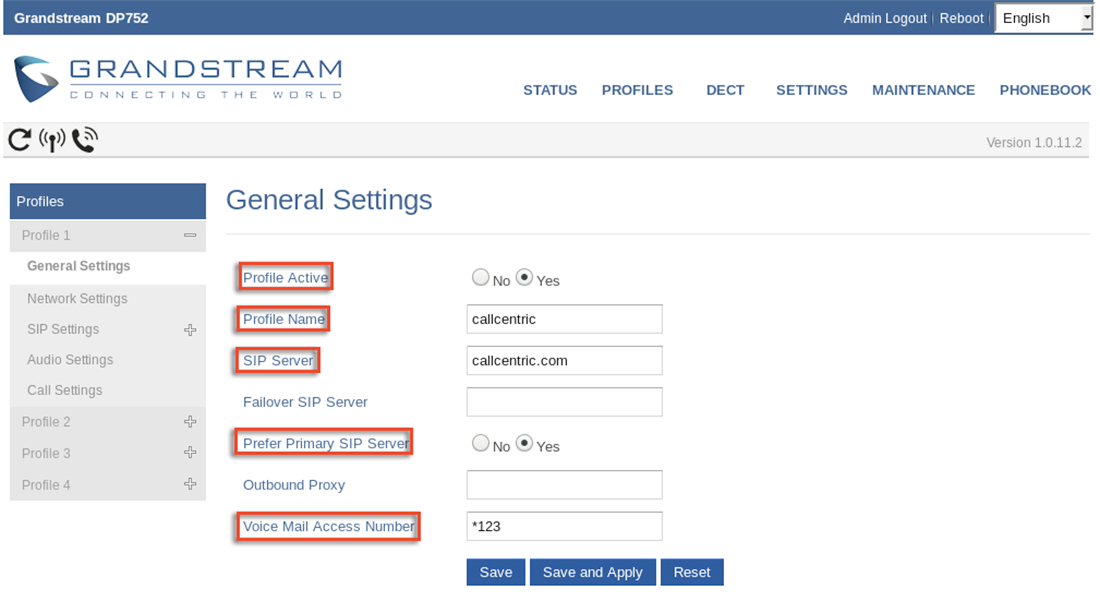
From the top menu bar, locate the sub menu option Profiles >> Profile 1 >> General Settings. Please configure your settings in-line with those detailed in the screenshot below. After doing so, click on the Save and Apply button (on the bottom of the page) to save/apply your settings:
| |
| Setting | Value |
| Profile Active | Yes |
| Profile Name | callcentric |
| SIP Server | sip.callcentric.net |
| Prefer Primary SIP Server | Yes |
| Voice Mail Access Number | *123 |
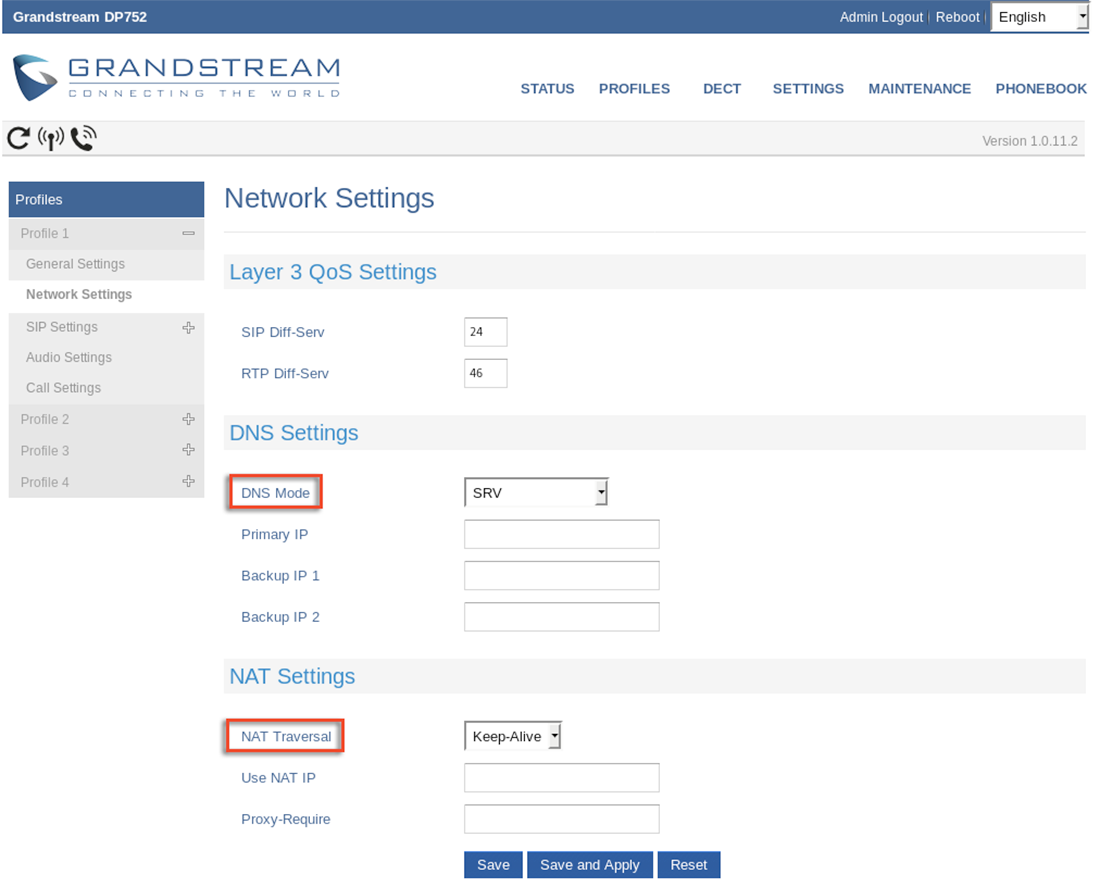
Next, select the Network Settings option on the side menu bar. Please configure your settings in-line with those detailed in the screenshot below. After doing so, click on the Save and Apply button (on the bottom of the page) to save/apply your settings:
| |
| Setting | Value |
| DNS Mode | SRV |
| NAT Traversal | Keep-Alive |
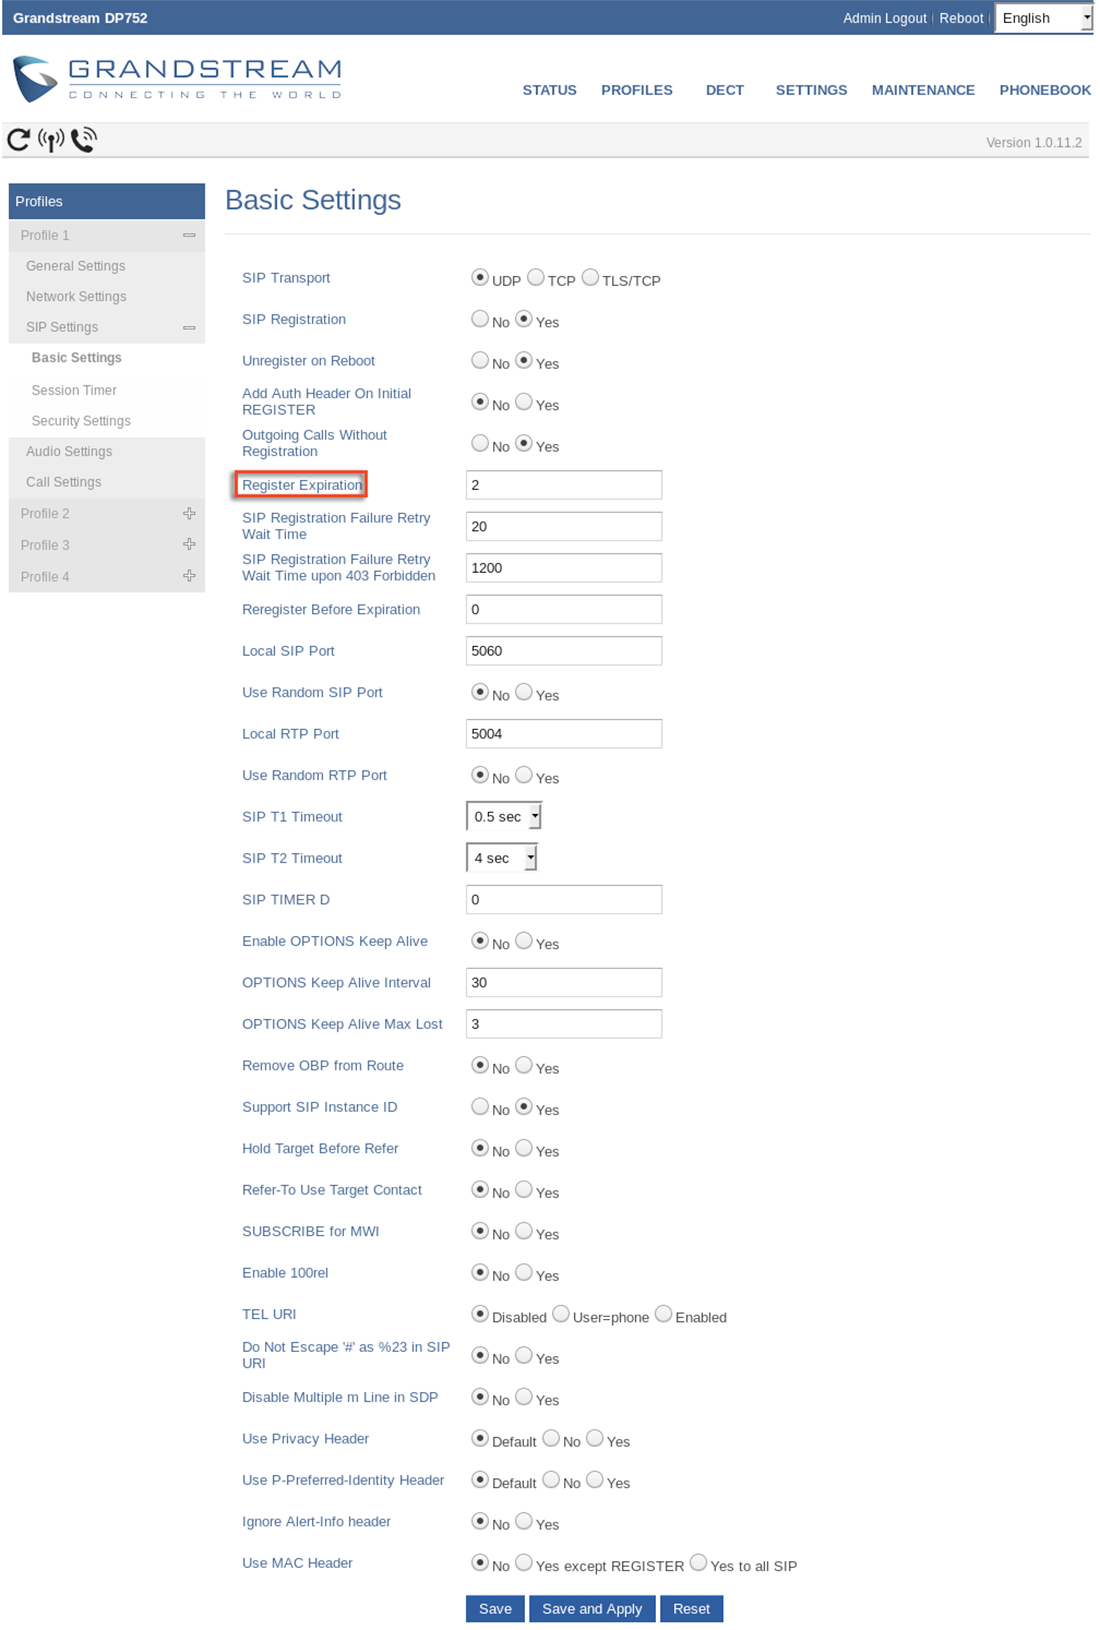
Next, select the SIP Settings option on the side menu bar, followed by Basic Settings. Please configure your settings in-line with those detailed in the screenshot below. After doing so, click on the Save and Apply button (on the bottom of the page) to save/apply your settings:
| |
| Setting | Value |
| Unregister on Reboot | Yes |
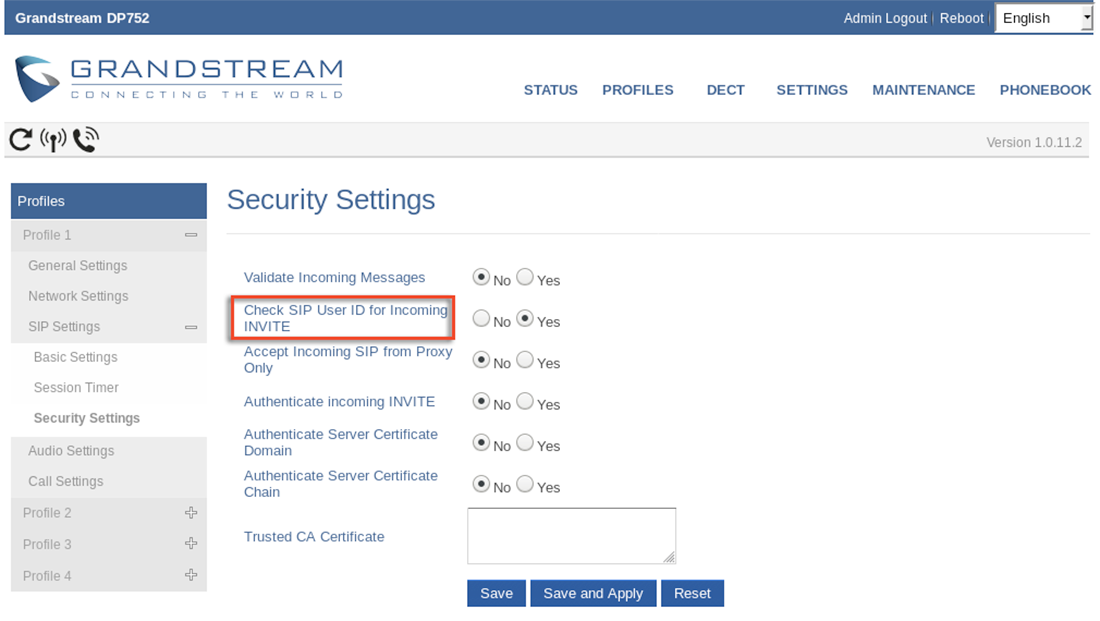
Next, select the SIP Settings option on the side menu bar, followed by Security Settings. Please configure your settings in-line with those detailed in the screenshot below. After doing so, click on the Save and Apply button (on the bottom of the page) to save/apply your settings:
| |
| Setting | Value |
| Check SIP User ID for Incoming INVITE | Yes |
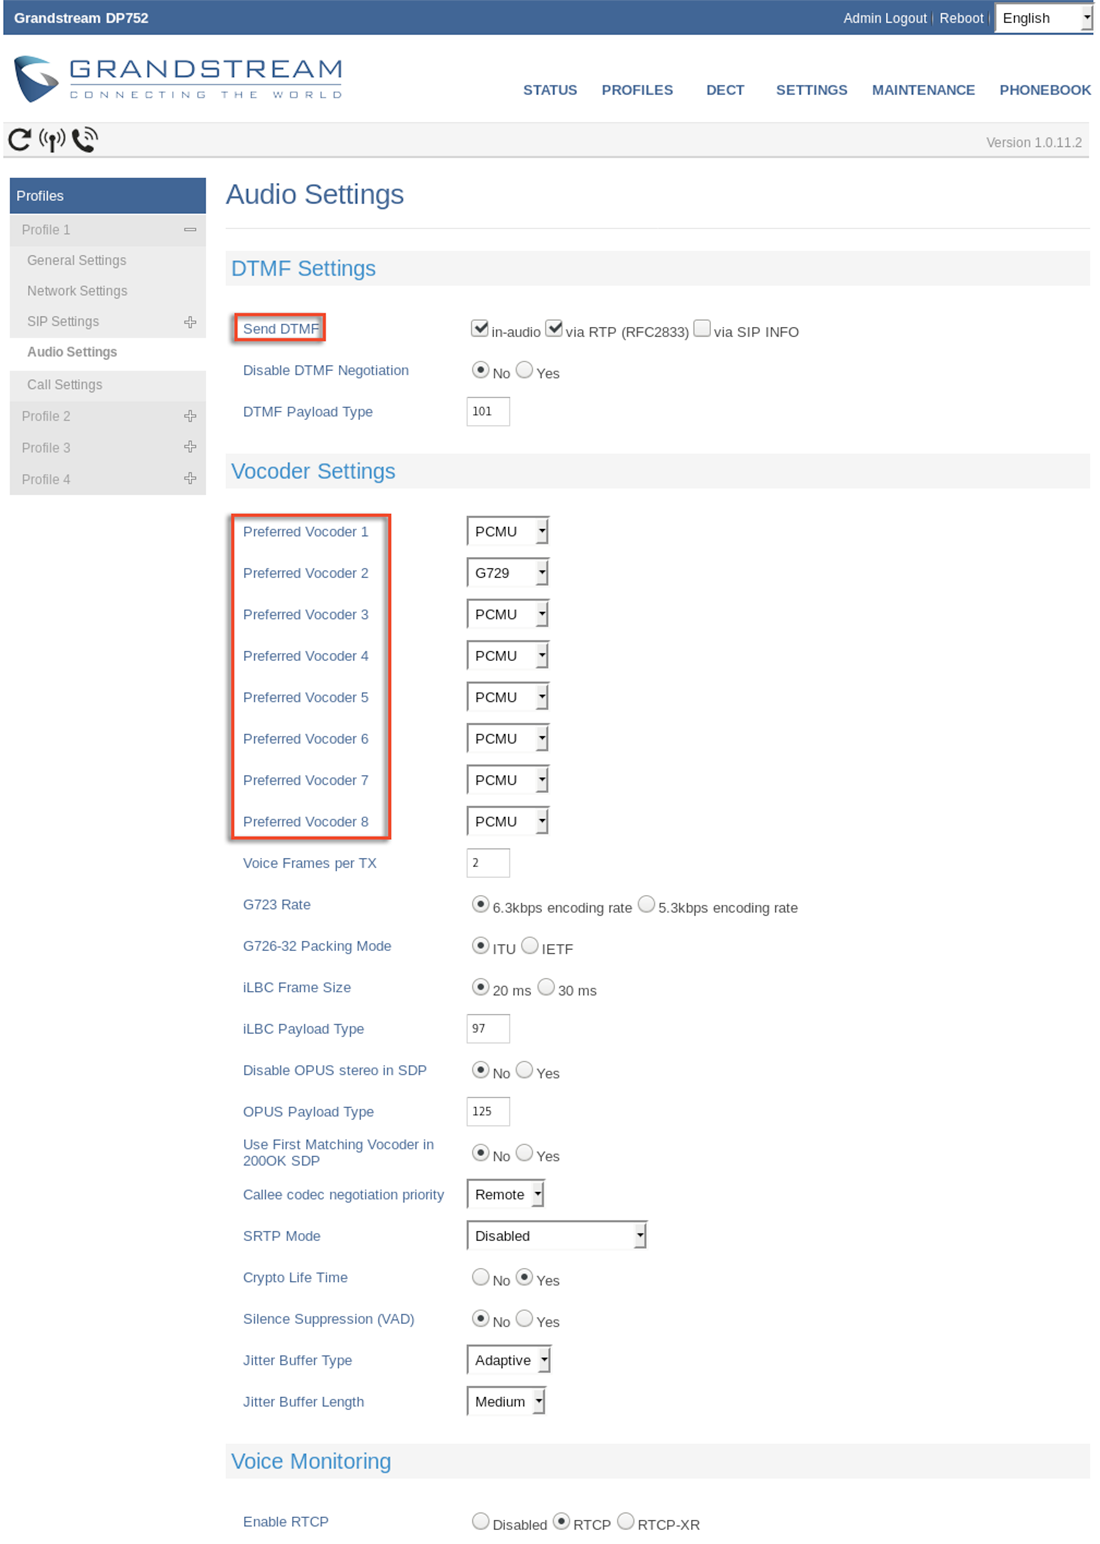
Next, select the Audio Settings option on the side menu bar. Please configure your settings in-line with those detailed in the screenshot below. After doing so, click on the Save and Apply button (on the bottom of the page) to save/apply your settings:
| |
| Setting | Value |
| Preferred DTMF Method | 1 - RFC2833
2-3 In-Audio |
| Preferred Vocoder | 1 - PCMU
2 - G729
3-8 PCMU |
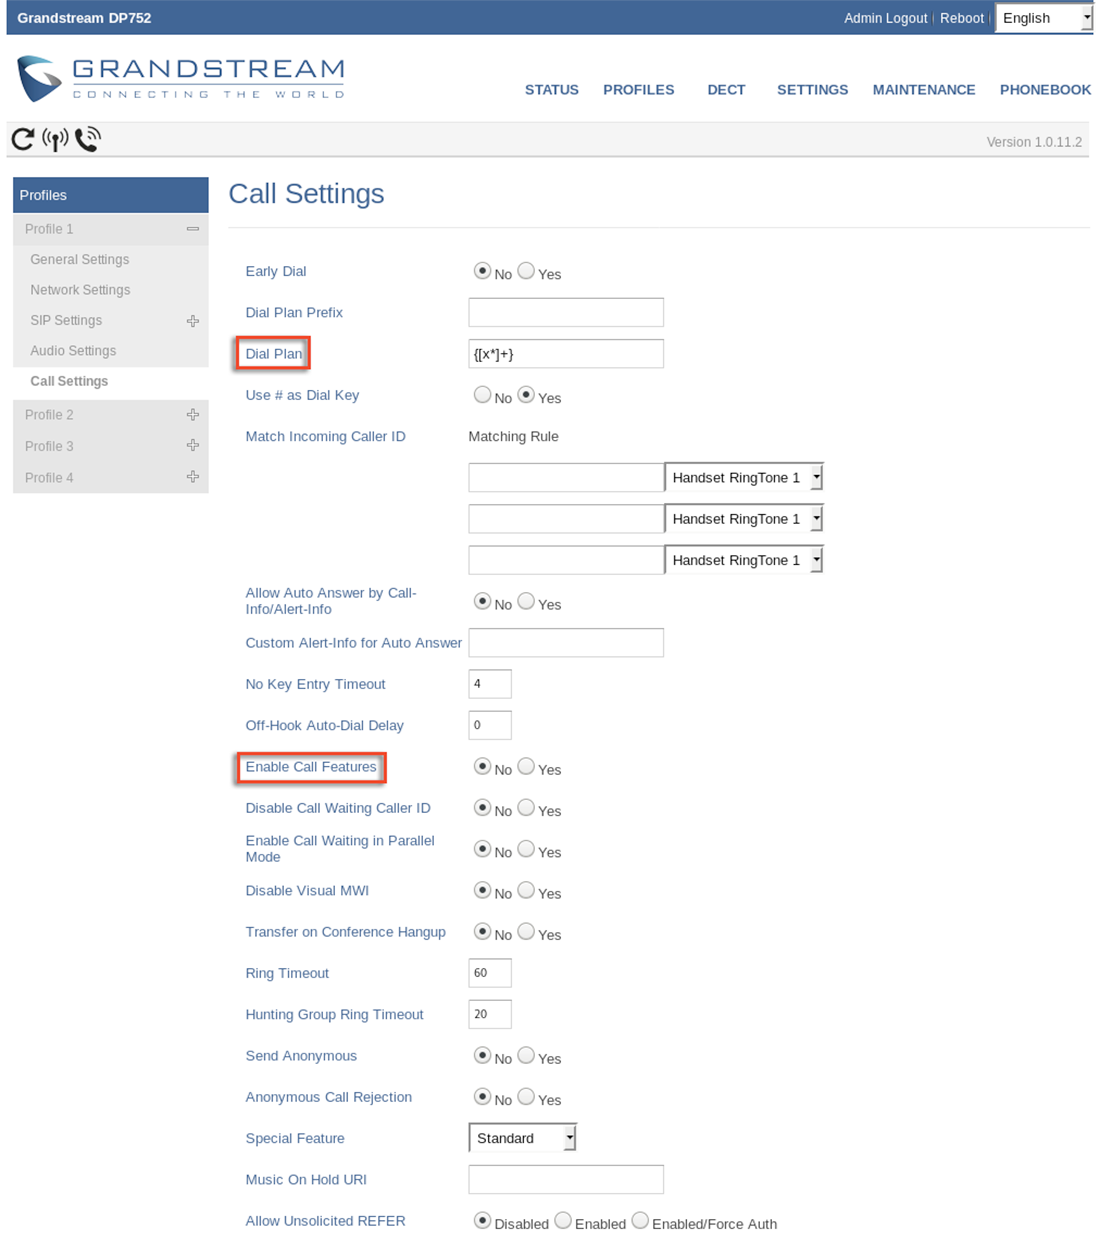
Next, select the Call Settings option on the side menu bar. Please configure your settings in-line with those detailed in the screenshot below. After doing so, click on the Save and Apply button (on the bottom of the page) to save/apply your settings:
| |
| Setting | Value |
| Dial Plan | {[x*]+} |
| Enable Call Features | No |
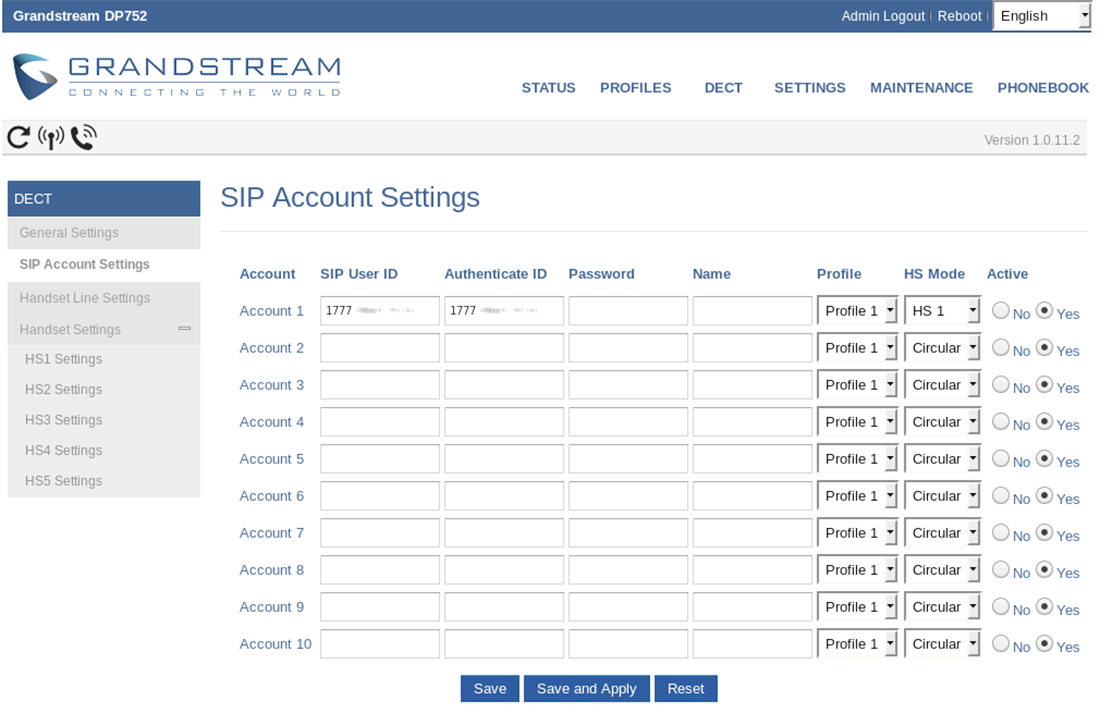
Finally, select the DECT option on the top menu and then select SIP Account Settings on the side menu bar. Please configure your settings in-line with those detailed in the screenshot below. After doing so, click on the Save and Apply button (on the bottom of the page) to save/apply your settings:
| |
| Setting | Value |
| SIP User ID | This is either the default extension 1777MYCCID OR 1777MYCCIDEXT, where 1777MYCCID is the 1777 number assigned to you by Callcentric and EXT is the three digit extension you are trying to register this UA to.
For example: 17770001234101 would register to extension 101 on account 17770001234.
You cannot register to your account using only the extension number. |
| Authenticate ID | This is either the default extension 1777MYCCID OR 1777MYCCIDEXT, where 1777MYCCID is the 1777 number assigned to you by Callcentric and EXT is the three digit extension you are trying to register this UA to.
For example: 17770001234101 would register to extension 101 on account 17770001234.
You cannot register to your account using only the extension number. |
| Password | Enter your extension SIP Password here. Your extension SIP password is the password you created for the extension you are trying to use. You may edit the SIP password you wish to use in by logging into your My Callcentric account and clicking on the Extension menu link and then modifying the appropriate extension. |
| Name | You may enter any value for this option. |
| Active | Yes |
|
| Step 4 |
That's it! You can now make a phone call. |
|
You can make a test call to 17771234567, or if you are signed up for one of Callcentric's rate plans you can place a call to a traditional landline or mobile phone by dialing either:
1 + the area code and number for calls to the US
Or
011 + the country code, area code, and number for calls worldwide (you may also use 00 instead of 011).
|
|
|
