 | |
STEP 1
|
Connect your router with the supplied Ethernet network cable to the Cisco.
Now connect your phone to the port labeled "PHONE 1" on the back of the Cisco.
Finally plug the supplied power cable into the Cisco. |
STEP 2
|
Wait 60 seconds after plugging your Cisco in. |
STEP 3
|
Pick up the phone connected to the Cisco and push the function button located on
the top of the Cisco. |
STEP 4
|
Have a pen and paper ready. You will hear the welcome message, then enter
2 1 # on your phone. You will now here a message giving you the IP address
of your Cisco such as - "192.168.001.010" write this number down and
hang-up the phone. |
STEP 5
|
Open a web browser on your computer such as Internet Explorer and enter the IP
address you heard in step 4 as the address and then /dev (I.E. where you
would normally enter www.yahoo.com).
For example, the configuration page for a Cisco ATA with the IP address 192.168.1.10 is:
http://192.168.1.10/dev
Please note: some browsers will require you to remove leading zero's ( 0 's ) in the IP address.
For example if you heard "192.168.001.010" you should change this to "192.168.1.10". |
STEP 6
|
You should now see a page that looks like this:
|
STEP 7
|
Enter the password for the Cisco in the password field. The default administrator
password for the Cisco is "admin" (without quotes). |
STEP 8
|
After entering the password you should see a screen that looks roughly like this:
Click the option SIP PARAMETERS in the menu on the right hand side of the page.
|
STEP 9
|
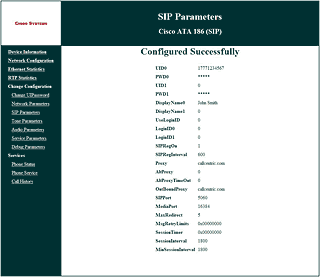
You will now see a screen that looks like this:
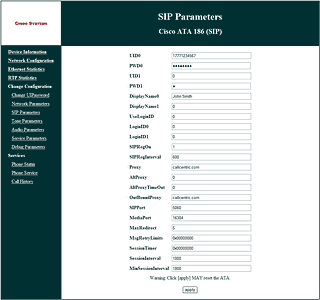
Click here to see enlarged image
Fill in this screen as listed below:
| Menu Item | Setting |
| UID0: | This is either the default extension 1777MYCCID OR 1777MYCCIDEXT, where 1777MYCCID is the 1777 number assigned to you by Callcentric and EXT is the three digit extension you are trying to register this UA to.
For example: 17770001234101 would register to extension 101 on account 17770001234.
You cannot register to your account using only the extension number. |
| PWD0: | Enter your extension SIP Password here. Your extension SIP password is the password you created for the extension you are trying to use. You may edit the SIP password you wish to use in by logging into your My Callcentric account and clicking on the Extension menu link and then modifying the appropriate extension. |
| UID1: | Enter "0" in this field |
| PWD1: | Enter "0" in this field |
| Display Name0: | Enter your name in this field |
| Display Name1: | Enter "0" in this field |
| UseLoginID: | Enter "0" in this field |
| LoginID0: | Enter "0" in this field |
| LoginID1: | Enter "0" in this field |
| SIPRegOn: | Enter "1" in this field |
| SIPRegInterval: | Enter "600" in this field |
| Proxy: | Enter "sip.callcentric.net" in this field |
| AltProxy: | Enter "0" in this field |
| AltProxyTimeOut: | Enter "0" in this field |
| OutBoundProxy: | Enter "sip.callcentric.net" in this field |
| SIPPort: | Enter "5060" in this field |
| MediaPort: | Enter "16384" in this field |
| MaxRedirect: | Enter "5" in this field |
| MsgRetryLimits: | Enter "0x00000000" in this field |
| SessionTimer: | Enter "0x00000000" in this field |
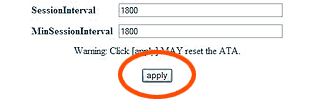
| SessionInterval: | Enter "1800" in this field |
| MinSessionInterval: | Enter "1800" in this field |
|
STEP 10
|
Click the apply button.
|
STEP 11
|
You will now see a screen that looks like:
|
STEP 12
|
Your Cisco will reboot after you click the apply button. Please wait at least 60
seconds for the unit to finish rebooting. Once the unit has finished rebooting you should no longer see the
light on top of the Cisco blinking red. If the light is no longer blinking red then your unit is configured
and ready to make calls, please continue to the next step.
If the light on the top of the Cisco is still blinking red, please wait 2 minutes and then unplug the power,
wait 10 seconds and plug it back in. If after another 2 minutes the light continues to blink red please verify
that the settings you entered into the Cisco in step 9 are correct, and that your internet connection is
currently up and running.
|
STEP 13
|
That's it! You can now make a phone call.
You can make a test call to 17771234567, or if you are signed up for one of Callcentric's rate plans you
can place a call to a traditional landline or mobile phone by dialing either:
1 + the area code and number for calls to the US
Or
011 + the country code, area code, and number for calls worldwide
(you may also use 00 instead of 011). |
