| GENERAL INFORMATION |
 |
Aastra provides a wide range of IP phones and devices to choose from.
In this guide we will be focusing on configuring the Aastra 6753i SIP phone, running Firmware version 2.6.0.66.
You may also use this guide to assist you with configuration of similar Aastra products.
|
|
| RESOURCES |
|
Websites:
Aastra 6753i information
Help / Support:
Aastra 6753i support page
|
|
| Aastra 6753i |
|
In this guide we will go through configuring the Aastra 6753i in order to register it to the Callcentric servers so that you will be able to place and receive calls using your Callcentric account. Before moving forward please ensure you have properly added the device to your network and that you have acquired the proper IP address. The phone should be turned on and running and you should have access to the device's configuration menus.
We recommend that you read each step through in its entirety before performing the action indicated in the step.
|
 | |
| STEP 1 |
Logging into your device |
|
First we will acquire the IP Address of your device, if you haven't already done so. You can acquire the IP of your device by:
1. Hitting the Options buttons
2. Scrolling down to and selecting Phone Status
3. Selecting IP&MAC Addresses
Your IP Address should be shown to you, along with other network information. If your IP Address is 0.0.0.0 please make sure that your device is properly connected to your network.
Once you have acquired your IP login to your device by using http://IP_ADDRESS/. If this is your first time logging into your device you may be asked to enter a username and password. By default this should be:
User: admin
Password: 22222
If you do not have this information then you will need to either reset or acquire this login information. Unfortunately we would not be able to provide support on this topic. You may however visit the Aastra support page for your specific device.
Once logged in you should see a screen similar to the one below:

|
| STEP 2 |
Configuring your Callcentric account |
|
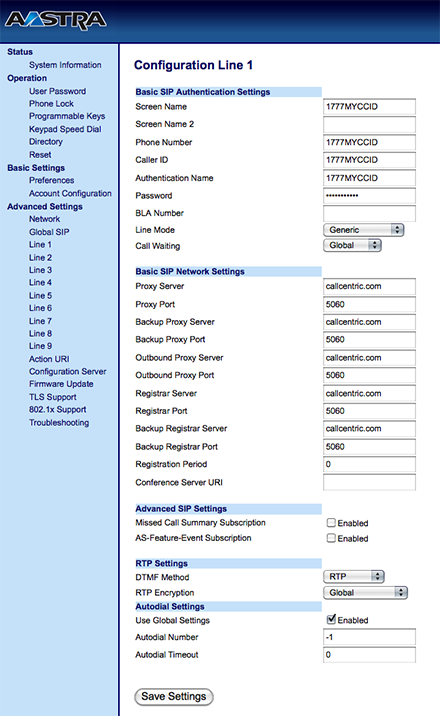
We will configure your Callcentric account on the desired Line number. Please select your desired line by clicking an available Line link and then entering the necessary account credentials.
Please use the information below to assist you. You may start with Line 1 if this is the first account being configured:
| Identification |
| Screen Name | Your Desired Name, or your 1777 number |
| Phone Number: | This is either the default extension 1777MYCCID OR 1777MYCCIDEXT, where 1777MYCCID is the 1777 number assigned to you by Callcentric and EXT is the three digit extension you are trying to register this UA to.
For example: 17770001234101 would register to extension 101 on account 17770001234.
You cannot register to your account using only the extension number. |
| Caller ID: | This is either the default extension 1777MYCCID OR 1777MYCCIDEXT, where 1777MYCCID is the 1777 number assigned to you by Callcentric and EXT is the three digit extension you are trying to register this UA to.
For example: 17770001234101 would register to extension 101 on account 17770001234.
You cannot register to your account using only the extension number. |
| Authentication Name: | This is either the default extension 1777MYCCID OR 1777MYCCIDEXT, where 1777MYCCID is the 1777 number assigned to you by Callcentric and EXT is the three digit extension you are trying to register this UA to.
For example: 17770001234101 would register to extension 101 on account 17770001234.
You cannot register to your account using only the extension number. |
| Password: | Enter your extension SIP Password here. Your extension SIP password is the password you created for the extension you are trying to use. You may edit the SIP password you wish to use in by logging into your My Callcentric account and clicking on the Extension menu link and then modifying the appropriate extension. |
Basic SIP Network Settings |
| Proxy Server: | sip.callcentric.net |
| Proxy Port: | 5060 |
| Backup Proxy Server: | sip.callcentric.net |
| Backup Proxy Port: | 5060 |
| Outbound Proxy Server: | sip.callcentric.net |
| Outbound Proxy Port: | 5060 |
| Registrar Server: | sip.callcentric.net |
| Registrar Port: | 5060 |
| Backup Registrar Server: | sip.callcentric.net |
| Backup Registrar Port: | 5060 |
RTP Settings |
| DTMF Method: | RTP |
Make sure to click Save Settings to save your changes. You will need to restart the phone manually in order for the settings to take effect. You can do this by:
1. Hitting the Options button
2. Scrolling down to and selecting Restart
3. The press the # button to confirm the restart.
You can view an example configuration in the image below:
Once your device reboots you should register to your Callcentric account. On the information page you should see something like the following:

|
| STEP 3 |
That's it! You can now make a phone call. |
|
You can make a test call to 17771234567, or if you are signed up for one of Callcentric's rate plans you
can place a call to a traditional landline or mobile phone by dialing either:
1 + the area code and number for calls to the US
Or
011 + the country code, area code, and number for calls worldwide
(you may also use 00 instead of 011).
|
|
|
