Setup information for other versions:
Asterisk Admin Gui version 13
Asterisk Admin Gui version 12
Asterisk Admin Gui version 2.11
|
| GENERAL INFORMATION |
 |
 Asterisk Admin GUI is an open source interface for configuring the Asterisk PBX server. This software can be attained directly from the Asterisk Admin GUI Website or through one of the major Asterisk distributions (trixbox, Elastix, PBX in a Flash, etc). The actual interface can vary slightly, based on the specific distribution you choose. Asterisk Admin GUI is an open source interface for configuring the Asterisk PBX server. This software can be attained directly from the Asterisk Admin GUI Website or through one of the major Asterisk distributions (trixbox, Elastix, PBX in a Flash, etc). The actual interface can vary slightly, based on the specific distribution you choose.
With Asterisk Admin GUI you are able to configure most of Asterisk's options without editing the individual configuration files. Below is a basic setup guide, as well as links to several resources that you can use to assist you in configuring your system. Due to the complexity and dynamic nature of the Asterisk Admin GUI Platform, unfortunately we cannot assist in fully customizing your install.
Please note, Callcentric is not responsible for preventing unwanted physical or remote access to your IP PBX. If your IP PBX is compromised, you will be responsible for all associated damages.
Please be sure to read this guide regarding securing your IP PBX solution.
|
|
| RESOURCES |
|
Websites
Asterisk Admin GUI
Help / Support
Asterisk Support Page
Asterisk Forum
Asterisk Wiki
Broadband Reports VoIP Forum
|
|
| Configuring Asterisk PBX (chan_sip) using the Asterisk Admin GUI interface |
|
Here we will configure Asterisk through the Asterisk Admin GUI administrative interface to properly route both incoming and outgoing calls to/from Callcentric. The information in this guide is based on Version 15.0.16.61 of the Asterisk Admin GUI (running Asterisk 16.6.2). This guide assumes that you've successfully installed Asterisk Admin GUI and that you have access to the administrative web interface.
We recommend reading each step through in its entirety before performing the action(s) indicated within the step.
We also recommend checking which version of Asterisk your PBX is based on, as there are significant differences between each revision. To check which version your PBX is based on, please log into your PBX's command line interface and execute the command show version or core show version. In doing so, you should see an output similar to the following:
Asterisk 16.6.2 built by mockbuild @ jenkins7 on a x86_64 running Linux on 2019-11-22 00:56:40 UTC
|
 | |
| STEP 1 |
Trunk Configuration |
|
In this section we'll configure a SIP trunk for your Callcentric Account on your Asterisk PBX.
- Login to the Asterisk Admin GUI administrative interface
- From the navigation bar at the top of the page, click on Connectivity >> Trunks
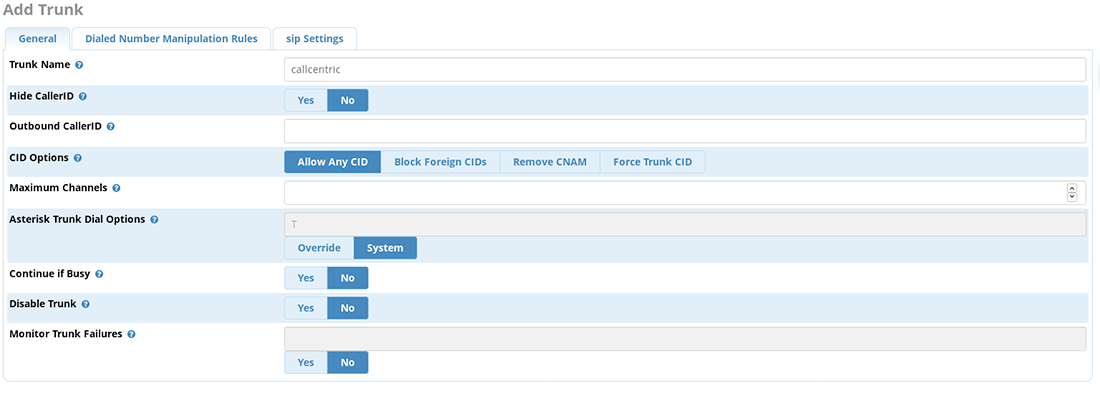
- Click the Add Trunk button on the middle of page, and select Add SIP (chan_sip) Trunk from the drop-down menu.
- In the General section, locate the Trunk Name option and specify callcentric on the given field
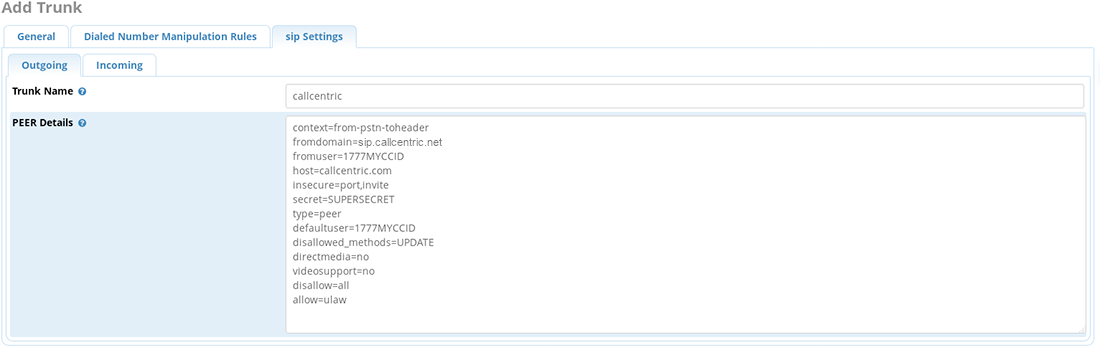
- Click on the SIP Settings tab, followed by the Outgoing sub-section tab
- Locate the Trunk Name option, and specify callcentric on the given field
- Copy/paste the following into the PEER Details field
context=from-pstn-toheader
fromdomain=sip.callcentric.net
fromuser=1777MYCCID
host=sip.callcentric.net
insecure=port,invite
secret=SUPERSECRET
type=peer
defaultuser=1777MYCCID
disallowed_methods=UPDATE
directmedia=no
videosupport=no
disallow=all
allow=ulaw
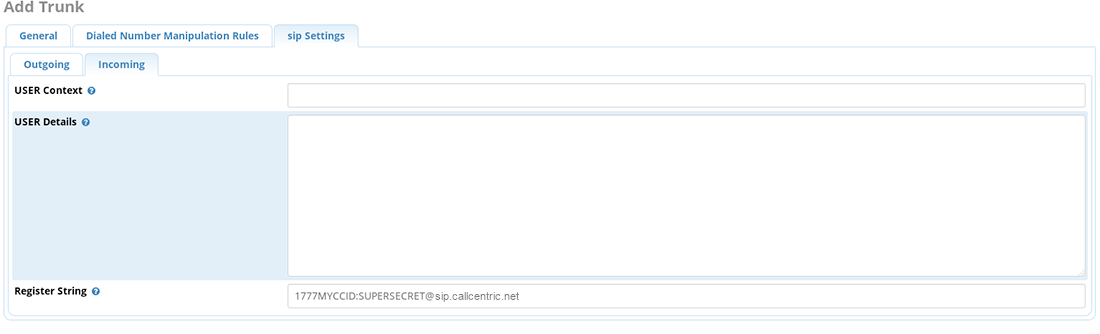
- Click on the Incoming sub-section tab
- Enter your Register string in this format:
1777MYCCID:[email protected]
Note: Any instance of 1777MYCCID should be replaced with the 1777 number assigned to you by Callcentric. EXT is the three digit extension you are trying to register this UA to.
For example: 17770001234101 would register to "extension 101" on account "17770001234". However, if you are registering towards the main/default extension of your Callcentric Account (extension 100), you can simply use your 1777 number without the 3 digit extension suffix (example: 17770001234). You CANNOT register to your Callcentric Account by only using the extension number; the full 1777 number ALWAYS needs to be included
Also, be sure to replace SUPERSECRET with your Extension's SIP Password. Your Extension's SIP Password is the password you created for the extension you are trying to use. You can edit your Extension's SIP Password by logging into your Callcentric Account and clicking on the Extension menu link and then selecting the extension you would like to update.
- Click on Submit Changes to add your new SIP trunk to your Asterisk server
- Click on the Apply Config button at the top of the screen to apply the changes you've just made
- From the navigation menu, click on Settings >> Asterisk SIP Settings
- From the General SIP Settings sub-section, locate the options Allow SIP Guests and Allow Anonymous Inbound SIP Calls and set them both to No
- Click on Submit Changes to save your changes
- Click on the Apply Config button at the top of the screen, to apply the changes you've just made
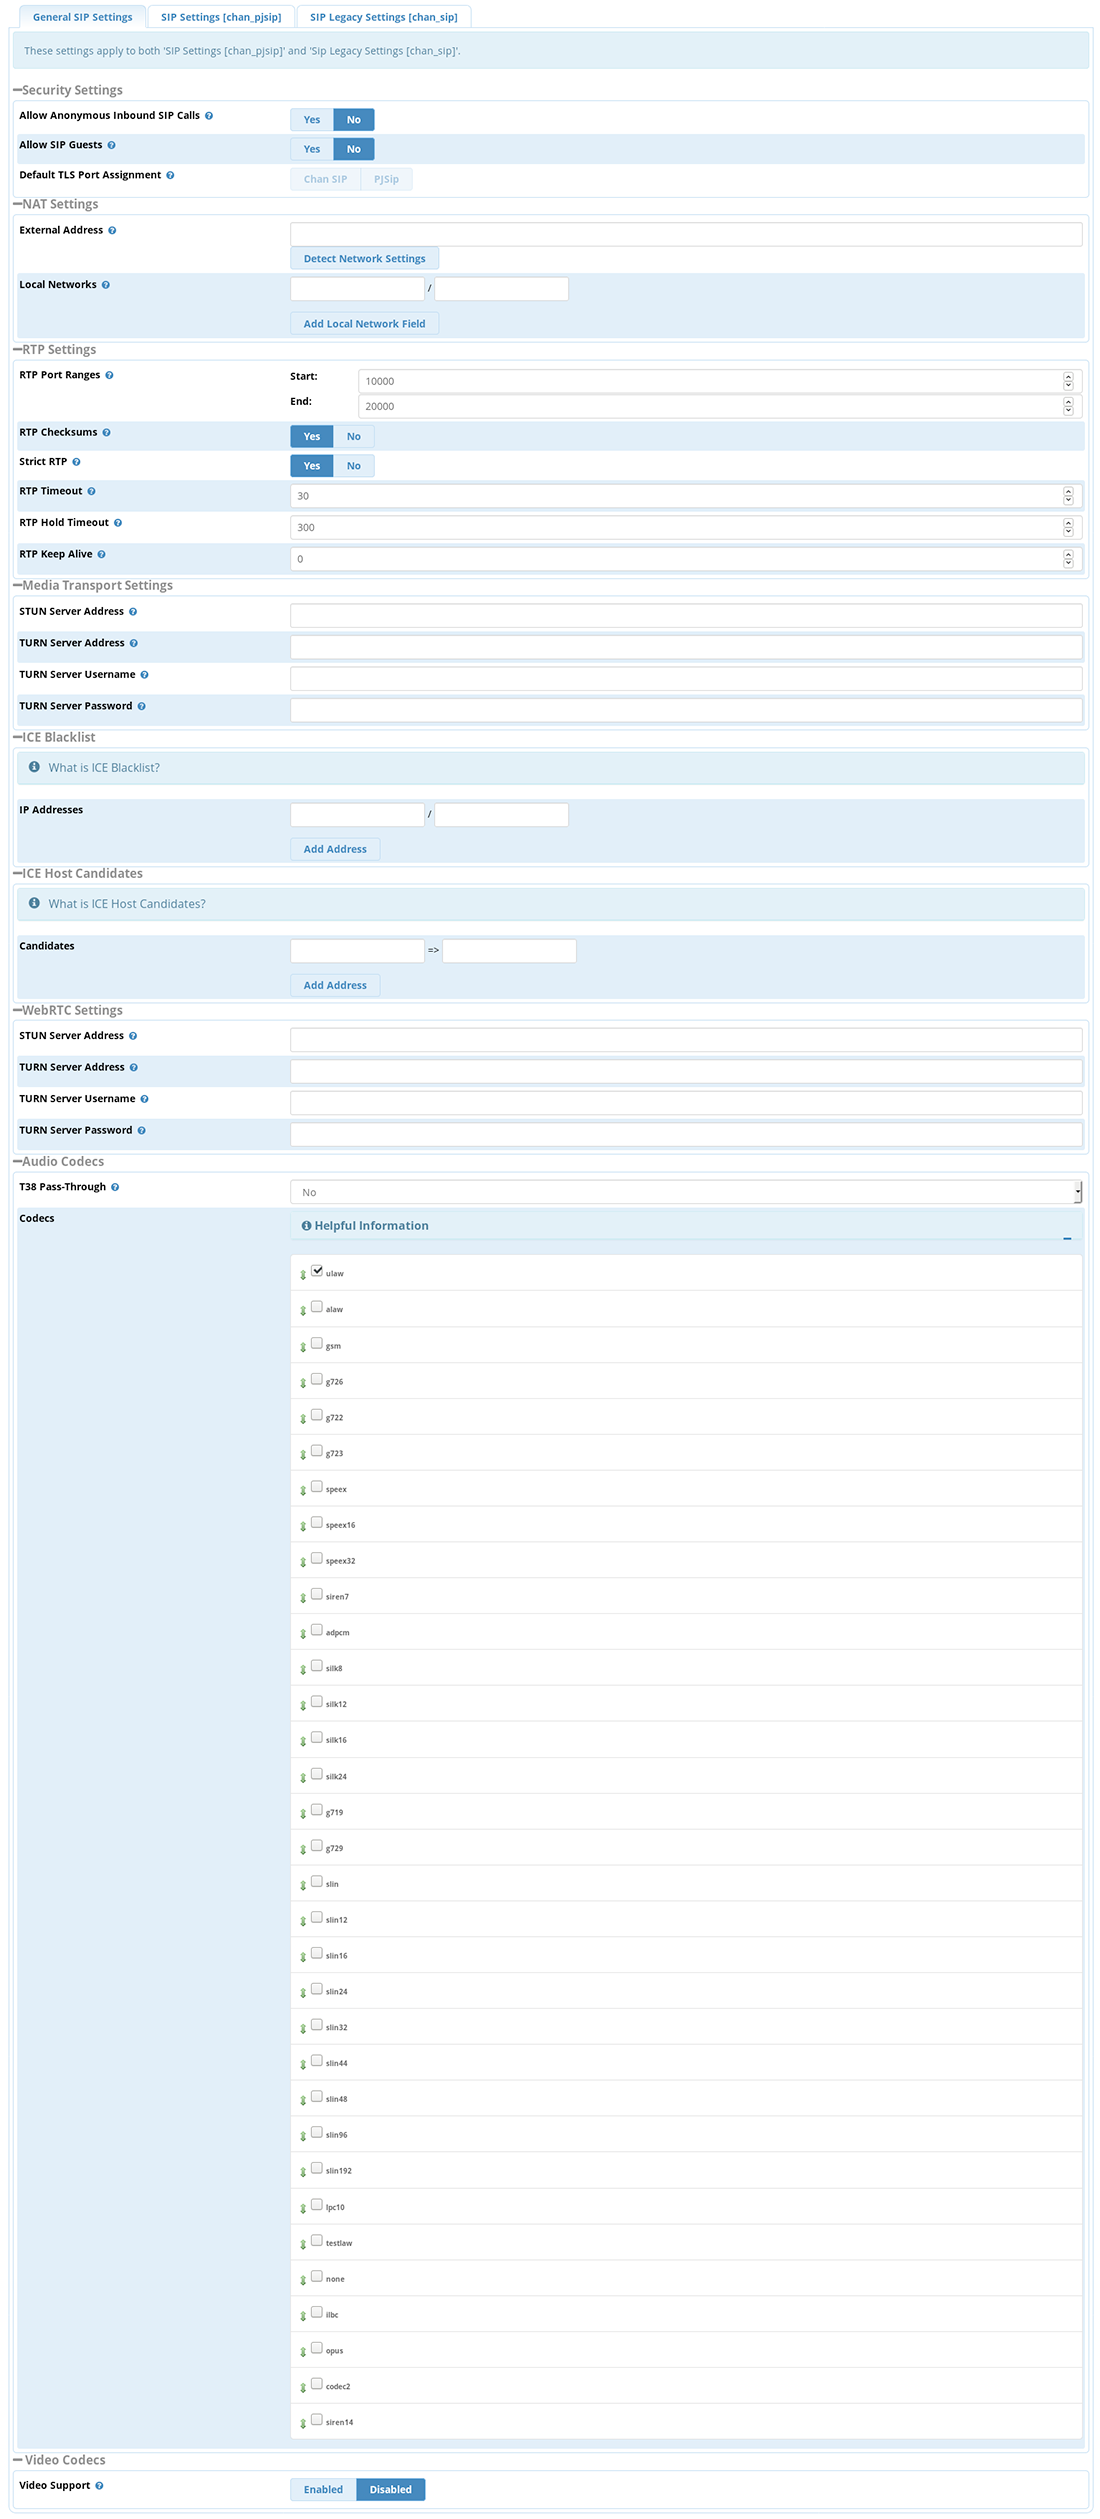
- From the sub-menu bar, click on SIP Legacy Settings [chan_sip] tab
- Locate the option SRV Lookup, and set it to Yes
- Locate the option Other SIP Settings, and use the following settings:
sendrpid = yes
trustrpid = no
disallowed_methods = UPDATE
session-timers = refuse
- Click on Submit Changes to save your changes
- Click on the Apply Config button at the top of the screen, to apply the changes you've just made

- From the navigation bar at the top of the page, select Admin >> Config Editor (this assumes that you have installed the Config Editor module on your Asterisk Admin GUI installation. If you haven't installed the Config Editor module, you can do so by visiting the Admin >> Module Admin configuration page)
- On the left pane, locate the file labeled sip_custom_post.conf and copy/paste the following into that file:
[callcentric1](callcentric);
host=alpha1.callcentric.com

[callcentric2](callcentric);
host=alpha2.callcentric.com

[callcentric3](callcentric);
host=alpha3.callcentric.com

[callcentric4](callcentric);
host=alpha4.callcentric.com

[callcentric5](callcentric);
host=alpha5.callcentric.com

[callcentric6](callcentric);
host=alpha6.callcentric.com

[callcentric7](callcentric);
host=alpha7.callcentric.com

[callcentric8](callcentric);
host=alpha8.callcentric.com

[callcentric9](callcentric);
host=alpha9.callcentric.com

[callcentric10](callcentric);
host=alpha10.callcentric.com

[callcentric11](callcentric);
host=alpha11.callcentric.com

[callcentric12](callcentric);
host=alpha12.callcentric.com

[callcentric13](callcentric);
host=alpha13.callcentric.com

[callcentric14](callcentric);
host=alpha14.callcentric.com

[callcentric15](callcentric);
host=alpha15.callcentric.com

[callcentric16](callcentric);
host=alpha16.callcentric.com

[callcentric17](callcentric);
host=alpha17.callcentric.com

[callcentric18](callcentric);
host=alpha18.callcentric.com

[callcentric19](callcentric);
host=alpha19.callcentric.com

[callcentric20](callcentric);
host=alpha20.callcentric.com

[callcentricB1](callcentric);
host=bravo01.callcentric.net

[callcentricB2](callcentric);
host=bravo02.callcentric.net

[callcentricB3](callcentric);
host=bravo03.callcentric.net

[callcentricB4](callcentric);
host=bravo04.callcentric.net

[callcentricB5](callcentric);
host=bravo05.callcentric.net

[callcentricB6](callcentric);
host=bravo06.callcentric.net

[callcentricB7](callcentric);
host=bravo07.callcentric.net

[callcentricB8](callcentric);
host=bravo08.callcentric.net

[callcentricB9](callcentric);
host=bravo09.callcentric.net

[callcentricB10](callcentric);
host=bravo10.callcentric.net

[callcentricB11](callcentric);
host=bravo11.callcentric.net

[callcentricB12](callcentric);
host=bravo12.callcentric.net

[callcentricB13](callcentric);
host=bravo13.callcentric.net

[callcentricB14](callcentric);
host=bravo14.callcentric.net

[callcentricB15](callcentric);
host=bravo15.callcentric.net

[callcentricB16](callcentric);
host=bravo16.callcentric.net

[callcentricB17](callcentric);
host=bravo17.callcentric.net

[callcentricB18](callcentric);
host=bravo18.callcentric.net

[callcentricB19](callcentric);
host=bravo19.callcentric.net

[callcentricB20](callcentric);
host=bravo20.callcentric.net
***** The value that you've specified on the option Outgoing settings >> Trunk Name within your trunk configuration page, must be included within the parentheses on the settings above. For example, if you've specified callcentric (all lowercase) as presented above; please specify the above settings as-is. To further illustrate, if you've specified Trunk_1 for that option, you will need to include the following:
[callcentric1](Trunk_1);
host=alpha1.callcentric.com

[callcentric2](Trunk_1);
host=alpha2.callcentric.com

etc...
Your configuration should look similar to the screenshot below:
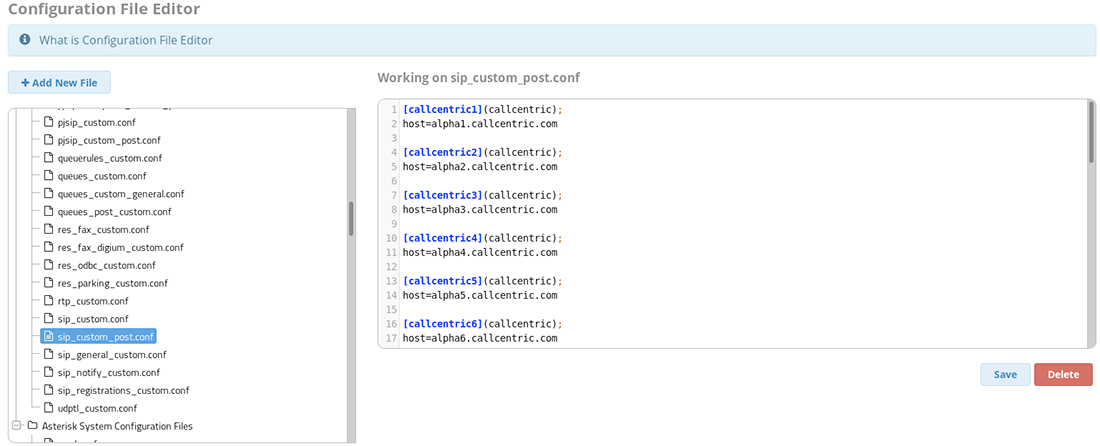
- Click on Save to save the file above
- Click on the red Apply Config button at the top of the screen, to apply the changes you just made
* If you do not have the Config Editor module installed, you will need to login to your server and edit the /etc/asterisk/sip_custom_post.conf file manually, usually with an editor such as nano.
|
| STEP 2 |
Outbound Route Configuration |
|
An outbound route sends calls (which are dialed in a certain pattern) to your desired provider, in this case Callcentric.
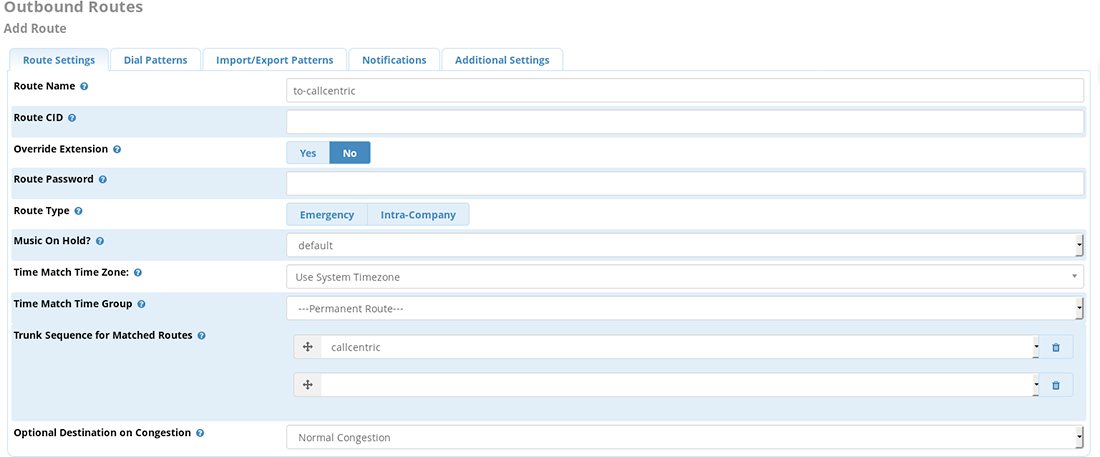
- From the navigation bar, click on Connectivity >> Outbound Routes, to configure your PBX to route outgoing calls towards your Callcentric trunk
- From the sub-section Route settings, enter to-callcentric in the Route Name field
- Locate the Trunk Sequence for Matched Routes section, and select the callcentric trunk from the drop-down list
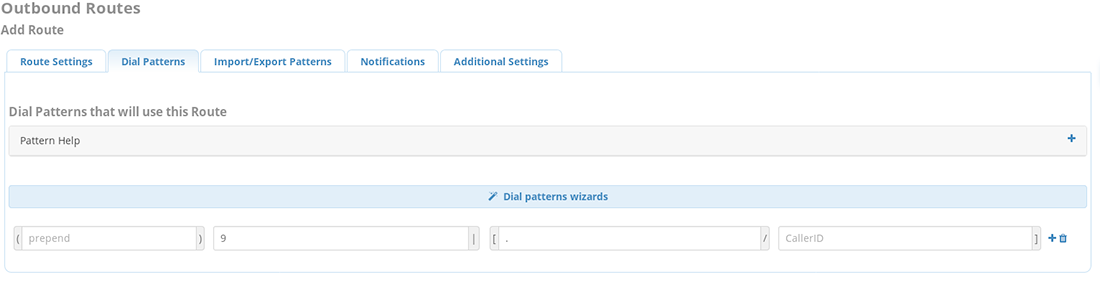
- From the sub-menu bar, click on Dial Patterns
- Locate the Dial Patterns that will use this Route section, and specify the following options:
|
| prepend | |
| prefix | 9 |
| match pattern | . |
| CallerID | |
- Click on Submit Changes to add your new outbound route to your Asterisk server
- Click on the Apply Config button at the top of the screen, to apply the changes you've just made
|
| STEP 3 |
Extension Configuration |
|
In this step, we'll create a local extension on your PBX. This local extension (on your PBX) provides an account number that another User Agent (software or hardware used for calling) can connect to in order to make and receive calls. Here we will create a SIP Extension.
If you have already configured an extension, you may skip this step. Then in the next step (Inbound Route Configuration) you may use your pre-configured extension.
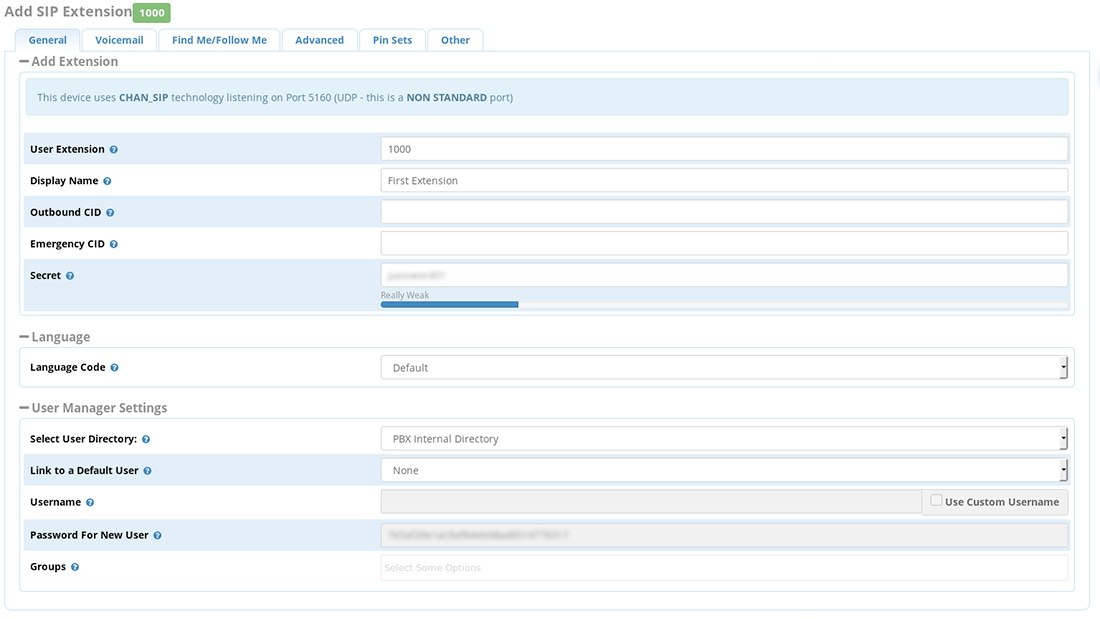
- From the navigation bar, click on Applications >> Extensions to add a new extension which will connect to your Asterisk server
- From the drop-down menu, select Add New SIP (Legacy) [chan_sip] Extension
- Enter 1000 as the User Extension
- For now we will use a generic identifier for this extension. Enter First Extension for the Display Name field. Later, you may enter a unique identifier of your choice
- Enter your desired password in the Secret field. You will use this password when configuring your desired UA, in order to connect to your Asterisk PBX
- Click on Submit Changes to add your new extension to your Asterisk server
- Click on the Apply Config button at the top of the screen, to apply the changes you've just made
|
| STEP 4 |
Inbound Route Configuration |
|
With an inbound route you are given the flexibility to send incoming calls to a wide range of destinations. For example, you can route an incoming call to a specific extension, a ring group, or an IVR.
In this section we are going to setup an inbound route which will handle ANY incoming call on ANY number (including emergency numbers), and simply route those calls to a specific extension (1000). At a later point, you can configure more complex routing schemes, such as DID Based Routing.
If you have already configured an extension,then you may substitute your pre-configured extension for point 4 below.
- From the navigation bar, click on Connectivity >> Inbound Routes to configure the routing of calls to your Callcentric account.
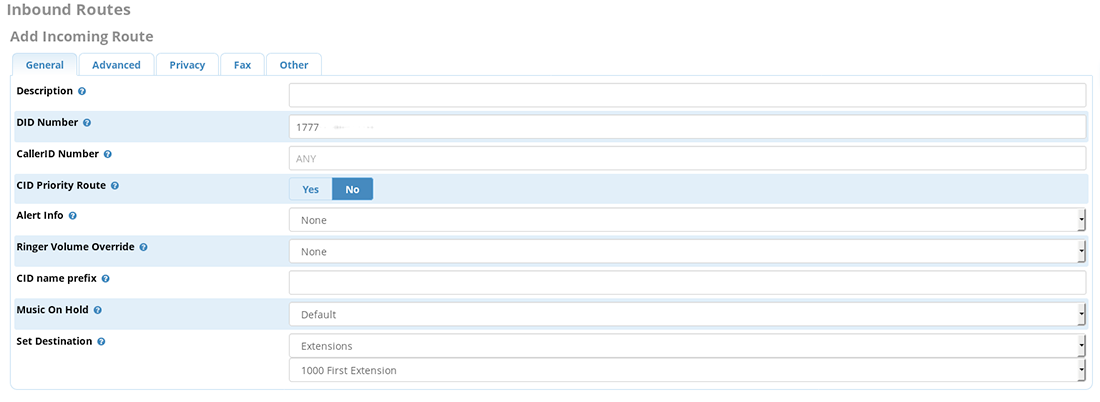
- If there isn't a default inbound route already defined within your PBX, click on Add Incoming Route to create a new one. In the DID Number field enter either your 1777 number OR a phone number that you've activated to your Callcentric Account (i.e. if you've acquired the number 12125551000, please use 12125551000 on this field). Make sure to leave the Caller ID Number blank, in order to match any incoming call. This is useful if you wish to receive all calls.
- Scroll down to the Set Destination section and choose First Extension (1000) from the Core drop-down box
- Click on Submit Changes to add your new inbound route to your Asterisk server
- Click on the Apply Config button at the top of the screen, to apply the changes you've just made
|
| STEP 5 |
Configure and test UA |
|
- Choose your desired UA
- To connect to your Asterisk box, use the IP Address (or hostname) for your server in conjunction with "1000" (the extension created earlier) and the password for the "1000 extension"
- Next, you will want to try placing test calls to/from your Asterisk PBX using the UA currently connected to your newly created extension (1000)
IMPORTANT NOTE: By default the chan_sip driver listens on port 5160. If you've created extensions that are using the chan_sip driver, you will have to specify <IP ADDRESS/DOMAIN of PBX>:5160 as the registration server. For example, if your PBX has the IP address 192.168.1.12; you will need to use 192.168.1.12:5160 as the SIP registration server for your UA.
If you have changed the default listen port for the chan_sip driver OR if you would like to double-check which port it's listening on; please visit the Asterisk SIP Settings >> Chan_SIP Settings configuration page and review the option Bind Port.
|
| STEP 6 |
Placing Test Calls |
|
You can make a test call to 17771234567, or if you are signed up for one of Callcentric's rate plans you
can place a call to a traditional landline or mobile phone by dialing either:
1 + the area code and number for calls to the US
Or
011 + the country code, area code, and number for calls worldwide
(you may also use 00 instead of 011).
To test inbound calls from Callcentric to your Asterisk installation, follow the directions listed in this FAQ. |
|
|
